On your inwink website, connected users can receive notifications. Here is an explanation of how you can configure notifications.
1. Add notification menus in your website
In order to use notifications, you need to first make sure the header menu of your website contains the right items to let your participants access the notifications.
Go to your event's back office > Website tab > Site content > Website pages, edit the horizontal menu and go to the options tab.
Here you will find the various options that you can activate:
- Use global seach: adds a magnifying glass icon in the header menu. When the participants click on it, they are redirected to the global search page of your event, where they can look for any item contained in your event (session, partner, speaker, etc.).
- Show mail icon: adds a mail icon in the header menu. When the participants click on it, a pop-in window unrolls containing all the discussions they have started so far. When a new message is sent to the participant, a little 1 in a red bubble is displayed above the mail icon to let them know a new message is waiting for them.
- Show notifications icon: adds a bell icon in the header menu. When the participant clics on it, a notification panel slides in from the right side of the screen, containing all the pending notifications (only notifications that have been already read, or about a new message, are not displayed there). A little 1 in a red bubble is displayed above the bell icon if a new notification is waiting for the participant.
- Show login / user profil icon: adds a log in icon at the right hand of the header menu. If the participant is not connected and clicks on the icon, they will be reidrected to the authentification page of the website to log in. If they're logged in, their picture is displayed in a circle, and when they click on it, they're redirected to their information page in their personal space, where they can set up their profile.
For instance, here is a menu containing the global search icon (magnifying glass) and the login icon displayed when the user of the website is not connected:

If the participant clicks on the log in icon on the right side of the menu and logs in, they will then have access to this menu (the notifications icon appears):

IMPORTANT: you can hide the notifications icon in the menu. However, this won't disable notification toasts, as explained in the next section of this page.
The icons cannot be changed, or displayed in a different order.
2. Notification toasts
If a participant is registered and logged in, all the notifications they might receive while logged in will be displayed in toasters that will appear on their screen as the notification is received:
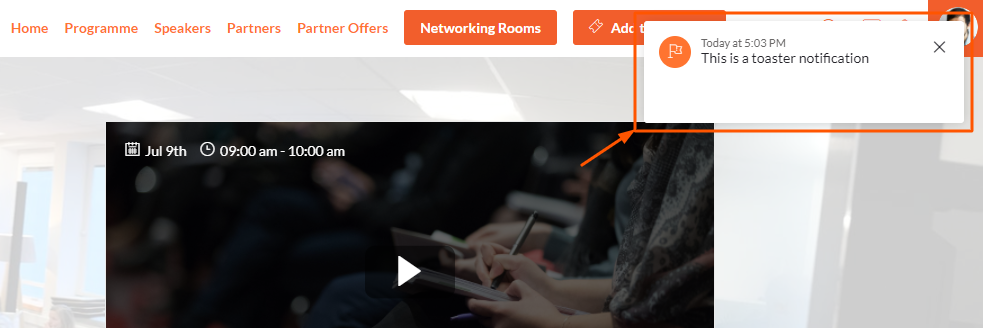 A toaster notification sent by the organizer
IMPORTANT: if the participants are not logged in while they receive the notifications, these notifications will be stored in the notification center which can be opened by clicking on the notification icon in the header menu. 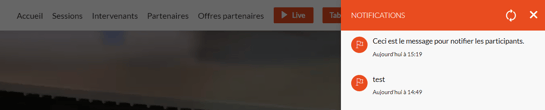
3. List of notifications available in inwink
There are several types of notifications that a participant can receive :
- Organizer notifications: participants can receive notifications sent by the organizer from the participant grid in the back-office (more information in the last section of this page)
- Networking contact notifications: participants will receive a notification when they receive a contact request, when their contact requests are accepted, or when their contact requests are denied
- Meetings-related notifications: participants will receive a notification when they receive a meeting request, when the status of the meeting request changes, when the meeting request starts (10 minutes before the start date of the meeting)
- Videoconference notifications: participants will receive a notification when one of their contacts tries to contact them thorugh the videoconference feature of your website
- Personal agenda notifications: participants will receive a notification 10 minutes before a session starts if they have added this specific session in their agenda
⚠️ If a participant is also a member of a partner's team, they will receive notifications whenever another participant sends a meeting request to the partner, or whenever the status of a meeting organized between the partner and participants is updated.
4. Send organizer notifications from the back-office of your event to participants
In your event back office, you can send messages in the form of notifications directly from the participant grid (these messages must be concise, however, and may not contain raw links or HTML).
Go to the participant grid, click on the 3 dots at the top left of the grid, then on Selection or Current view, then on Notify selection or Notify all view :
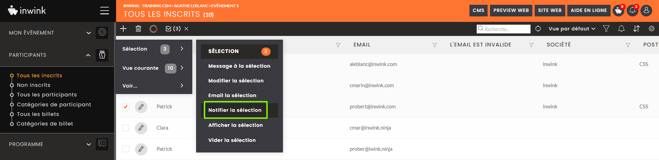
A window opens, allowing you to enter a title and your message. You can also add a link to the notification.
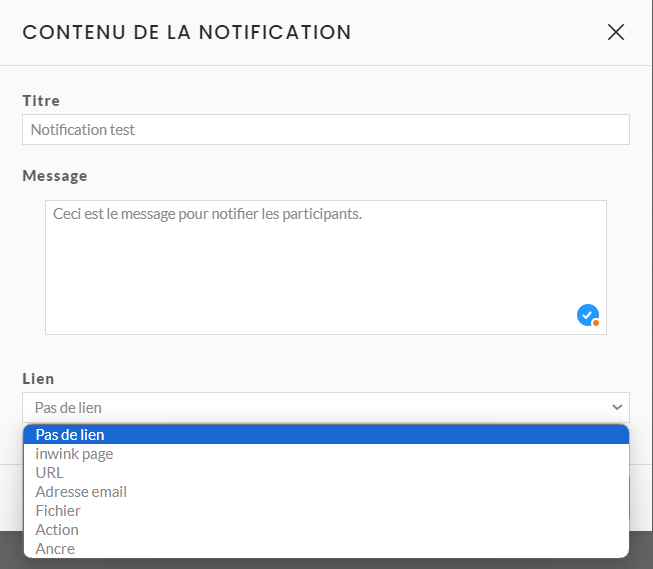
IMPORTANT: do not enter HTML in the notification. Also, notification sent by the organizer cannot contain a link.
Push notifications, ie. notifications a mobile user receives while their device is on sleep mode, are only available for users who have installed an app containing your event on their device.