Quick access:
- Create a session
- Online session
- Forms
- Other information
- Custom fields
- Add an online session to an event website
Create a session
Go to the Progam tab > All sessions and create a new session by clicking on ➕ in the top left corner of the grid. A window pops in.
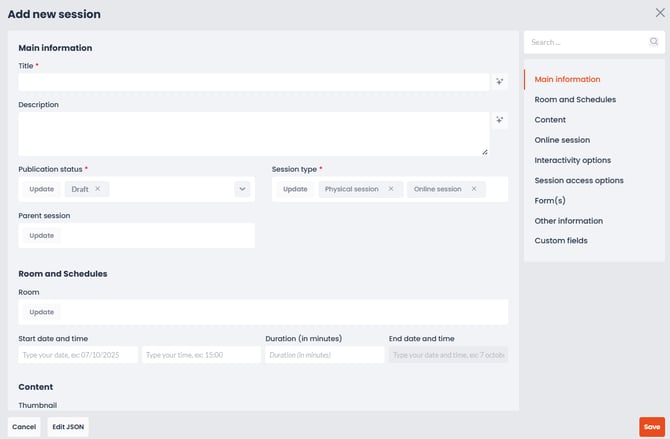
Here are the options you will need to fill in:
Required fields are marked with an asterisk *
- Title*: write the title of the session
- Description: write the description of the session
- Publication status*: select the publication status of your session
- Draft: the session is only in your grid in the back office
- Preview: the session is visible on the website, only in preview
- Published: the session is visible to everyone on the website
- Session type: Choose whether you want to create an online session, a physical session, or both
- Room: select the room that will be linked to the session.
- Start date and time: enter the day and time of the session start date here.
- Duration (in minutes): add the session time.
➡️ The session end date and time will then be calculated automatically. - Thumbnail: upload a thumbnail that will be inserted over your video before it starts.
The optimal size of the thumbnail is 900-pixel wide and 600-pixel high. The image shouldn't include textual content. - Speakers: select the speakers for the session
- Partners: select the partners of the session
- Event themes: select the event themes to be associated with the session
Online session
In the case of an "Online session", in addition to the above, you must choose to use video content or activate a live inwink

- Video source: select the type of video source you wish to use:
- iframe (URL)
Insert the link to the iframe containing the video player (Youtube, Vimeo, etc.)
(To learn more about embedding video in iframes, check out this article : Video iframe integration) - video file
Choose your video file (.avi, .mpeg, .mp4, .ogv, .3gp, .webm)
The video can be played in simulive - speed meeting inwink (online help on this subejct ➡️ here)
- iframe (URL)
-
Interactivity options

- Show discussion module: tick this checkbox if you want the session to feature a chat module where attendees will be able to ask questions
- Show questions/answers module: tick this checkbox if you want the session to feature a questions/answers module where participants can leave their questions and speakers can write an answer
In this module, it is also possible to filter by popularity and to like a message. - Show the interactivity tab: check this box if you want the session to have polls (yes/no, single choice, multiple choice), which you can schedule in the Back-Office or directly in the session as a speaker, or if you want to add an action button to link to another page
- Show Next sessions tab: Allows you to view upcoming sessions, a video tutorial is available on the inwink training website
- Allow watch together: The watch Together option allows you to watch, share, comment on a session with multiple participants, remotely (more details on this online help)
- Hide people information: tick this box to hide attendees information when they leave a comment
- Hide Session Information Tab: Select this checkbox to hide the session information
- Hide Partners Tab: Check this box to hide partners for this session
- Moderate messages and questions before publication: if a participant writes a message during the session, you have the possibility to validate it before it is visible by all
- Specific access options

- Lock Video Before Start Date: tick this checkbox to lock the access to the video of the session before its official start date. When this checkbox is ticked, another option appears to let you specifiy how many minutes before the start date the attendees will be allowed to open the session.
- Lock Video After End Date: same as above, but after the official end date of the session
- Session available for unregistered users of the event (anonymous users) : by checking this box, you allow people not registered and not connected to your event (and to the session) to view it
⚠️ Discussion and question-and-answer modules as well as session-related forms are not displayed for non-logged-in (anonymous) users
-
- Moderators: select the moderators of the session
- inwink speed meeting: Choose the duration of the speed meetings, whether participants can extend a meeting, and which categories of participants can meet
Activate INWINK Live: inwink Live functionality uses credits/tokens
To learn more about inwink live sessions, please read this article: inwink live sessions
Forms

- Specific registration survey: select the specific registration survey for the session you wish to use
- Specific session access form: select the specific session access form you wish to use
- Specific post-session survey: Select the specific post-session form you wish to use
Other information

- Max number of registrants allowed: tick the checkbox and enter the maximum number of registrations allowed to the session
- Quota : check this box to indicate a quota of the number of registrants for the session
If you specify a quota, registrations to the session will be blocked once the quota is reached. The user browsing the site will be able to access the session whose quota has been reached (on the session page: details), but will not be able to register for it, a "Full" button will be present:
- Add session to all attendees agendas (ex:keynote): tick this checkbox to add this session to the personal agenda of all registered users
- Make session visible only for the following categories of participants : select the categories of participants who are allowed to attend the session
Custom fields

- Media gallery: Add videos containing information about your session
- Brochures: Add a brochure containing information related to your session
To learn more about creating fields, visit this article Field: definition and configuration
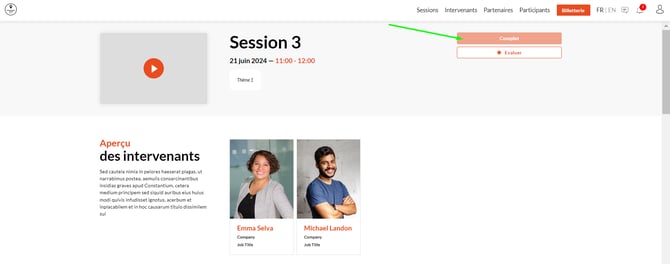
dd an online session to an event website
When you create an online session, the Session Detail page of the session will automatically adapt to this new type of session.

In order to access the video, the user must be logged in and registered for the event.
A click on the video visual opens the virtual room of the session.
📒 The user is then considered as an attendee of the session in the inwink back-office.

In the right-hand side panel of this virtual room and while following the video, the participant can :
- ask questions
(if the option Show discussion module has been activated on the Session details page)
- vote for the questions that seem most relevant.
When the participant hovers his mouse over the name of a participant or over the logo of a session sponsor, he can contact him via the networking module.
Please note that it is now possible for a visitor to view a session without being logged in and registered as shown in this video