2. Import datas correctly
3. Importing data from another event
4. Import participants
5. Import partners
6. Import moderators
7. Import speakers
8. Import sessions
9. Import participants for a specific session
10. Import rooms
11. Import discount codes
12. Import team members
Import module
File upload
To import, click on the button ![]() at the top right of the grid.
at the top right of the grid.
The window below appears, select your file or drag it into the window. The supported formats are : XLSX / XLSM / ODS / XLS / XML
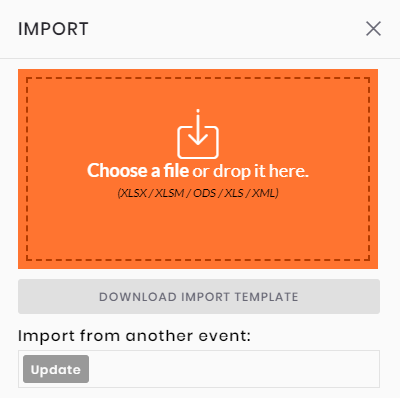
Your file is then loaded into the import module.
Module structure and functionnalities
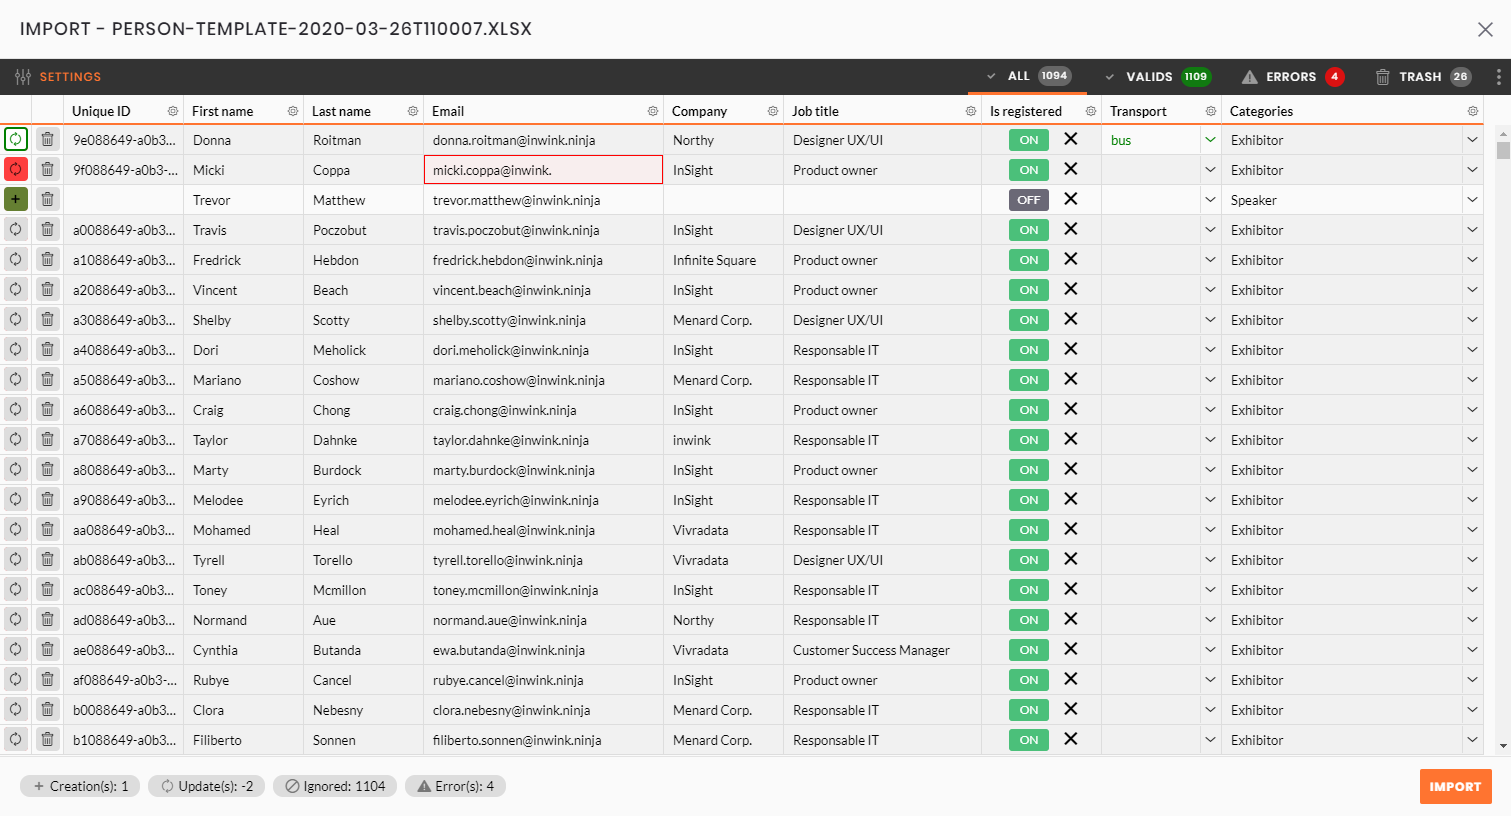
The window looks like a spreadsheet, with rows and columns.
In this window, you will find :
- The list of rows to import
- The parameters at the top left
- The views filtered by import status at the top right
- The different types of import at the bottom left
- The additional actions at the top right
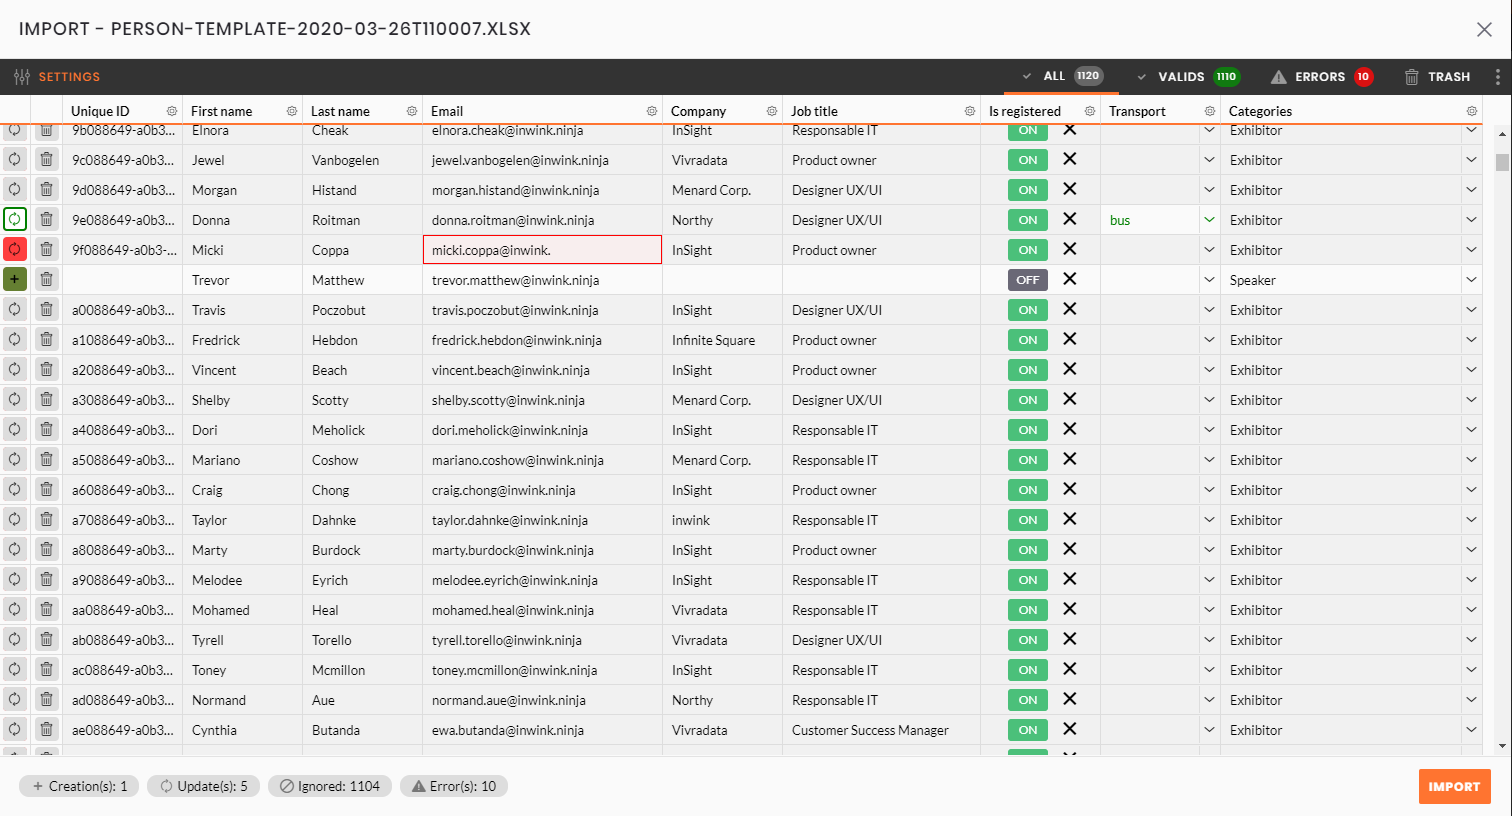
Lines list to import
This list contains the data of the file you have imported.
To know :
- By clicking on a data item, you can change its value or delete it
- Data with an incorrect format are displayed in red.
The import format is defined according to the type of the target inwink field - A ⚠️ panel on the column name indicates that the module has not made the link between the column in your file and the inwink field.
(See below how to map the fields between your file and the inwink module)
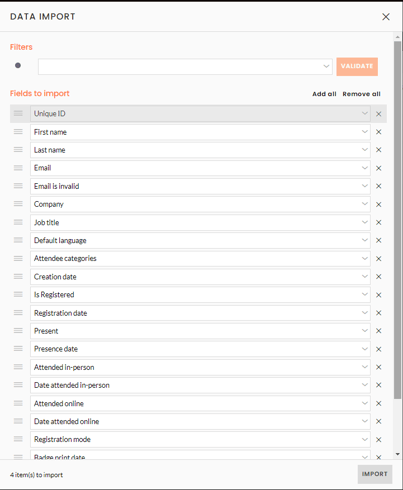
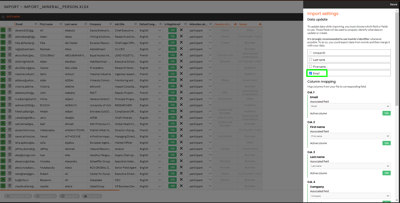
Parameters
The SETTINGS button, at the top left of the import window, allows you to :
- Choose the field(s) used to uniquely identify the elements
- Match columns and fields (column mapping)
- Deactivate columns during import
The menu is divided into two parts:
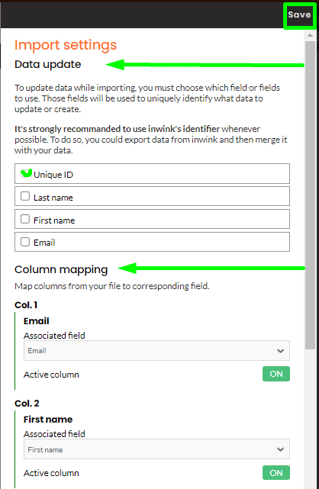
Data update
We advise you to use the unique ID for all grids (this ID is exportable)
Column mapping
This part allows you to perform data mapping by associating the columns of your file to the inwink database.
If you don't want to import a column from your file, deactivate the Active column option by switching it to OFF.
Once your settings adjusted, save it by clicking on SAVE.
Filtered views
The top menu shows :- the total number of rows to be imported
- the number of valid rows
- the number of errors* (if at least one data item in the row cannot be imported)

*Possible errors:
- Data to be imported as an email has the wrong format
- Data to be imported into a Yes / No field does not have a programmed value
Complementary actions
By clicking on the "3 little dots" at the top right of the window, you access to 2 actions:
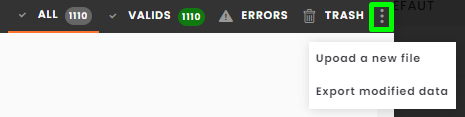
- Upload a new file
- Allows you to change the file for the import
- Export modified data
- If you made changes on your file from the import module window, you can export your new file by clicking on this button
Import types

- Import without update
If in your settings, you didn't indicate a field to base the update on, all lines will be imported in creation.
It is possible in this case that you have duplicates in your grid.
- Import with update
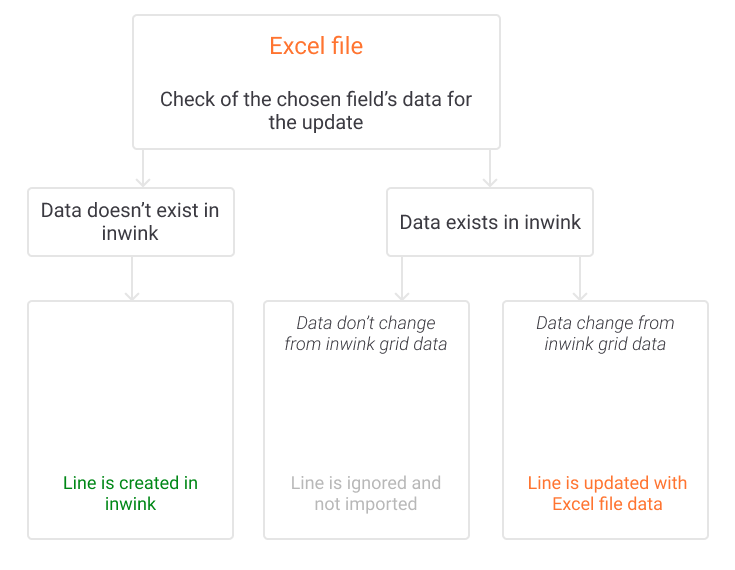
If in your settings, you indicate a field(s) to base the update on, your import will be divided inton four parts:
-
Lines created
- On these lines, the module didn't find in your inwink grid the data of the field the update is based on.
- These lines will have the indication
 on the left to show that it's a creation.
-
Lines updated
- On these lines, the module found in your inwink grid the data of the field the update is based on.
- On the imported columns, data have changed from the Excel file to the inwink grid.
- These lines will have the indication
 on the left to show that it's an update.
 - Green data will be updated on the inwink grid. Grey data will not be changed.
-
Ignored lines
- On these lines, the module found in your inwink grid the data of the field the update is based on.
- On the imported columns, data have not changed from the Excel file to the inwink grid.
- These lines will have the indication
 on the left to show that it is ignored.
-
Lines with errors
- On these lines, the module got a format error on one of the data to import.
- These lines will have the indication
 on the left that means that there is one or more errors.
 - Datas that don't have the right format are in red.
- See the section Import datas correctly to find the right format.
Import datas correctly
Text and multilines text field
The data is in text format
Email field
Data need to have an email address format, as:
texte@company.com
Unique choice field
The data to be imported must correspond to one of the possible values of the field.
Example:
- Field name: What is your knowledge on this subject?
- Possible values selectable by the participant:
- Limited knowledge
- Commun knowledge
- Advanced knowledge
If an incorrect value is entered, the module will offer to choose one of the correct values as a replacement.
Multiple choices field
As with Single Choice fields, the imported values must match the available values in the field.
If you want to import multiple values for a single row, separate your values with ||
Example: Limited knowledge || Normal knowledge || Advanced knowledge
Yes / No field
Field value is either True or False.
Module will transform it in ON or OFF
Date field
For your import, dates must have the following format:
MM/DD/YYYY HH:MMIf you import a data that looks like a date, when the file is loading, module will ask 3 options:
- Date with time
- Date without time
- Time only
Number field
Data must be a number, with 1 comma maximum.
Import datas from another event
You can import grid datas from another event.
In the IMPORT window click on the Edit button and select the event from which the data is to be imported.
Once the event is selected, the event grid datas appear:
- Select the rows you wish to import, to import all do not tick any rows
- Click on IMPORT SELECTION
- Choose the list of fields to import
- After clicking on IMPORT, the import module with the column mapping opens to finalise
Import participants
To import participants with a not registered status, the file must be imported in the "all participants" grid.
To import participants with a registered status, the file must be imported into the "all registrants" grid.
We recommend creating a sample participant in the back office, with all the information that should be present.
By exporting the data, the file can be used as a template to prepare a global file of participants to be imported.
Reminder: if there are already subscribers, to avoid duplication, check in the settings that the unique identifier is "email".
Non-importable fields
- Unique ID
- Is registered
- Photo
- Date of creation, registration, modification
- Fields that do not exist in your event
Import partners
We recommend creating a sample partner in the back office, with all the information that should be present.
By exporting the data, the file can be used as a template to prepare a global file of partners to be imported.
Non-importable fields
- Unique ID
- Logo/ Photo
- Time slots
- Galerie de média
- Team Members
- Offers
Import moderators
We recommend creating a sample moderator in the back office, with all the information that needs to be present.
By exporting the data, the file can be used as a template to prepare a global file of moderators to be imported.
Reminder: if there are already subscribers, to avoid duplication, check in the settings that the unique identifier is "email"
Fields you can import
- Participant : Firstname (if the moderator doesn't exist in the backoffice)
- Participant : Lastname (if the moderator doesn't exist in the backoffice)
- Participant : email
- Global moderator : yes/no
Import speakers
We recommend creating a sample speaker in the back office, with all the information that needs to be present.
By exporting the data, the file can be used as a template to prepare a global file of speakers to be imported.
When importing speakers, check that they do not exist in the participants' grid, otherwise they will be duplicated.
When importing participants, it is possible to assign the participant category "speaker" directly.
Non-importable fields
- Photos
- Sessions related to the speaker
Import sessions
We recommend creating a sample session in the back office, with all the information that needs to be present.
By exporting the data, the file can be used as a template to prepare a global file of sessions to be imported.
Non-importable fields
- Photos and logos
- Speakers
- Rooms
- Time Slots
- Thematic fields
- Partners
- Moderator
- Unique ID
- Quota
Importing participants to a specific session
To register participants for a specific session :
- Have the table to be imported
- Edit the session you wish to import participants into
- Tab Enrolled/ Participants click on the "Import data" arrows and select the file

Keep only the column "Participant: unique ID" and activate "Use this column as identifier" (by clicking on the small key with settings):
You can proceed with the import.
Import rooms
Non-importable fields
- Unique ID
- Logo/image
- Time Slots
Fields you can import
- Name of the room
- Room capacity
- Description
Import discount codes
Non-importable fields
- Partners
- Attendee category
- Discount Type
- Discount Amount
- Ticket : apply the discount on
- Maximum number of products per order on which the discount code can be applied
Fields you can import
- Name
- Description
- Code
- Quota
- Availability start and end date
- Ticket category
Import team members
Be sure to check in the settings that the inwink identifier is "Partner name".
Fields you need to put in your import
- Partner name
- Participant : Firstname (If the participant is created in the backoffice)
- Participant : Lastname (If the participant is created in the backoffice)
- Participant email
- Rôle (Business contact, Administrator, Badge access)