Manage registration quotas on your event’s free forms
The registration quota allows you to limit the total number of participants who can register for your event. This feature is particularly useful when the number of spots is limited—for example, for logistical, budgetary, or safety reasons.
You can set a quota for each registration form of your event (for example: different quotas for participants, exhibitors, or volunteers).
Setting a quota on a form
You can configure the quota directly from your form’s settings:
-
Go to your CMS.
-
Edit the form block.
- Enable the "Set a registration quota for this form" option.
.png?width=670&height=367&name=Illustrations%20aide%20en%20ligne%20(2).png)
4. Create the desired registration quota.
.png?width=670&height=441&name=Aide%20en%20ligne%20(1).png)
You can view all the quotas you’ve created—and create new ones—in your event’s back office under the Participants > Registration Quotas tab.
.png?width=337&height=323&name=Aide%20en%20ligne%20(34).png)
➡️ You can create a quota shared across multiple forms (all will close once the quota is reached), or a quota dedicated to a single form.
👉 If you set a quota of 100 spots and associate it with 3 forms, once the total registrations reach 100, all three forms will automatically close.
Once the maximum number of participants is reached, you can choose how the form behaves:
-
The form can close automatically, blocking any new registrations.
-
Or it can switch to a waiting list, allowing additional participants to be registered on hold until spots become available.
Managing registrations once the quota is reached
1. Automatically close the form
The form becomes inaccessible as soon as the registration quota is reached.
Any new registration attempt will display a message indicating that registrations are closed.
You can customize this message:
.png?width=670&height=334&name=Illustrations%20aide%20en%20ligne%20(6).png)
2. Switch to "Waiting List" mode
You can allow new registrants to pre-register on a waiting list.
This option is recommended if you want to maintain flexibility in managing participants.
In this case, their registration status will automatically change to On the waiting list.
This allows you to manage spots that become available later or manually approve certain participants in case of cancellations.

You can also customize the form introduction message to inform users that they will be placed on a waiting list when submitting the form.
.png?width=670&height=407&name=Illustrations%20aide%20en%20ligne%20(7).png)
Additionally, you can customize the final message displayed to users who completed the form but were placed on the waiting list.
.png?width=670&height=387&name=Illustrations%20aide%20en%20ligne%20(11).png)
📩 Tips: Make sure to configure your emails and triggers to inform people on the waiting list that their registration has been received.
No action is required regarding your form’s default values once the quota is reached, as long as you choose to open the waiting list.
The default values you previously configured will continue to be applied up until that threshold.
Once the quota has been reached, you don’t need to change anything: the “waiting list” status will be applied automatically.
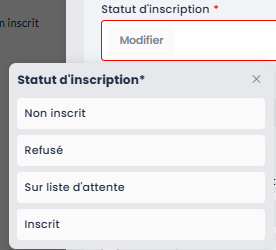
You can track participants’ status directly from their profile via the "Registration Status" field (⚠️ which replaces the former "Registered" label).
The available statuses are:
-
Not registered
-
Registered
-
Rejected
-
On the waiting list (➡️ used for participants placed on the waiting list when a registration form’s quota has already been reached).
➡️ Remember to manually update the status of people on the waiting list:
-
Select "Registered" as soon as a spot becomes available,
-
Or "Rejected" if no spots are available.
If no quota is set on a form, the number of registrations is unlimited.