Table of content
- Introduction
- Before you start
- Configure your commercialisation setup
- Monitor your commercialisation
- Use the different floor plans
- Reference: detailed description of the tabs
1. Introduction
What is the Commercialisation module used for?
The Commercialisation module lets you manage the exhibitor sales journey in inwink: participation requests, exhibitor files, offers, orders, contracts, invoicing and stand allocation. It centralises commercial and administrative information to simplify tracking for the organiser and streamline the experience for exhibitors.
What results can I achieve?
Commercialising a trade show is not limited to selling square metres. Exhibitors may have different objectives: gaining visibility, generating leads, meeting the right profiles, showcasing their expertise or increasing brand awareness.
By structuring your offers in inwink, you can provide journeys adapted to these different needs: stand selection, packages, included or additional products, visibility options, complementary services, and more.
This centralisation also simplifies the exhibitor experience. From their space, each exhibitor can find the information related to their participation, orders, documents and actions to complete. They can fill in their file, place an order and add certain products or services according to their needs.
For the organiser, the Commercialisation module makes it easier to monitor exhibitor files, orders and the key indicators of your trade show.
2. Before you start
Useful definitions
-
Commercialisation: refers to the initial sales journey offered to the exhibitor. It may include the stand selection, surface area in sqm, included or mandatory products, associated options and contract generation.
-
Initial order: groups together the items selected by the exhibitor during this journey: stand, surface area, package and products attached to the offer.
-
Exhibitor: refers to a partner with a stand at the event.
-
Partner without a stand: may take part in the event without going through exhibitor commercialisation, for example by purchasing only an additional product or service.
-
Confirmed commercialisation file: a file is considered confirmed when the associated contract has been validated. Until the contract is validated, the file may still change.
Prerequisites
Before configuring your exhibitor commercialisation, prepare:
- your exhibitor types and stand categories
- your offers, included products and additional options
- your quotas: badges, invitations, staff, etc.
- your pricing rules and invoicing terms
- the information to collect from exhibitors
- the expected journey for exhibitors.
Activate the Commercialisation module
The Commercialisation module must be activated on your event. We recommend contacting your CSM.
Once this module has been activated, go to the back office of your event and open the Commercialisation tab.
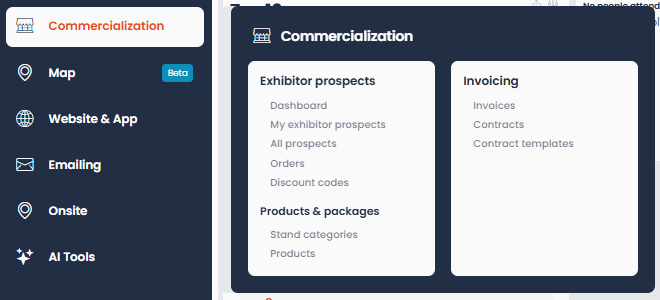
This tab lets you monitor exhibitor files, orders, products, stand categories, discount codes and, depending on your configuration, information related to invoicing.
3. Configure your commercialisation setup
Overview of the steps
- Step 2: build your stand offers.
- Step 3: configure additional sales.
- Step 4: configure the exhibitor journey.
- Step 5: prepare contracts, invoicing and emails.
Step 1: Create your products and organise your catalogue
The catalogue lets you offer products that exhibitors can purchase.
Products can be used in several contexts:
- included directly in an offer or stand
- offered as options during stand selection
- made mandatory depending on the stand type or selected surface area
- offered as an additional purchase after the initial order
- sold to partners who do not necessarily have a stand.
It is also possible, and recommended, to add a visual to products to make them easier for exhibitors to understand.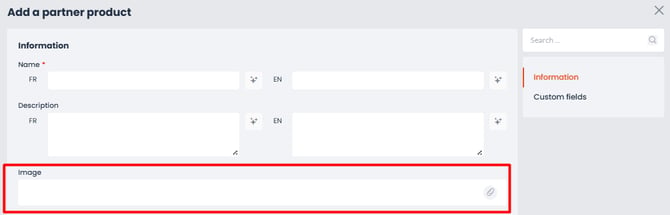
To create products, go to Products in the Commercialisation window and click the + button to add an offer.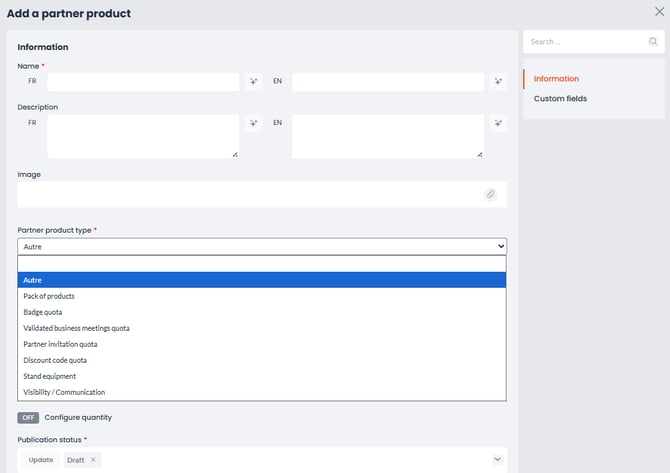
inwink provides different options to create the product type that matches your needs.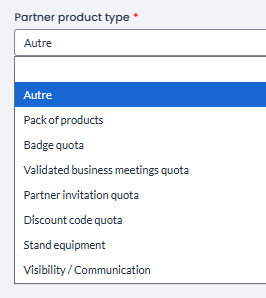
Your catalogue may contain stand-related products, such as furniture, electricity or technical equipment, as well as complementary services: visibility, sponsorship, invitations, additional badges, logistics services or sponsored content.
To make it easier to read, we recommend organising products by category. A clear catalogue helps exhibitors quickly understand what is included in their offer and what they can add to their order.
Manage pricing and availability periods
When creating a product, you can define its prices and, if needed, add a start date and end date for availability. This option can be used, for example, to manage early-bird prices, promotional periods or products available only during a defined timeframe.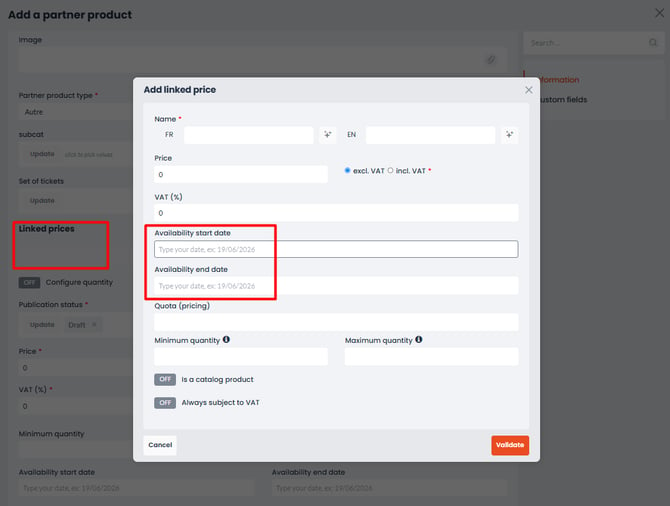
Step 2: Build your stand offers
Once your products have been created, you can build your stand offers from Commercialisation > Stand categories, then click the + button to create a new stand.
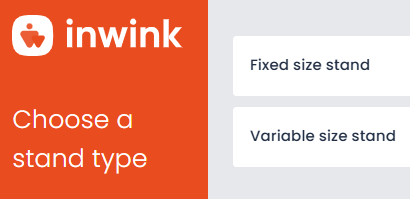
There are two ways to create stands:
- Variable-size stands: a variable-size stand lets the exhibitor choose a surface area. It is especially useful when you apply decreasing prices based on the number of selected square metres. You can customise pricing tiers and associate products only with certain tiers. For example, a product can be included or mandatory from a certain surface area, but not offered for smaller surface areas. You can also highlight certain tiers. You can also define a minimum number of square metres to restrict the available surfaces.
- Fixed-size stand: here, the organiser defines the price for the imposed number of square metres. This lets you offer a package with a set surface area and defined price.

Add visuals and attach products to the stand
For each stand created, you can add images.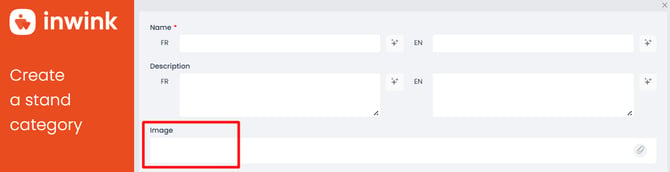
Adding an image makes the offer easier to read for exhibitors, especially if you offer several stand types. The visual can help the exhibitor better understand the proposed format before making a selection.
When creating stands, you can attach products that have already been created. These products are then associated with the stand in question.
When adding a product at stand level, several options are shown. You can select them depending on your needs:
- The product is included with the stand
- The product is mandatory when taking the stand
- Products correlated with the surface area: the quantity or price of the product automatically depends on the selected stand surface area. For a product to be correlated with the surface area in sqm, it must be configured as such in the form for the relevant stand.
Examples:
- The product is included with the stand
- The product is mandatory when taking the stand
- Products correlated with the surface area: the quantity or price of the product automatically depends on the selected stand surface area. For a product to be correlated with the surface area in sqm, it must be configured as such in the form for the relevant stand.
- Partitions / fitting-out: quantity adjusted according to the reserved surface area.
Step 3: Configure additional sales
You can also create a catalogue of additional products to display on a specific page in the partner space. The partner will not have a contract here, but an invoice for the additional products they purchased.
Example: the partner does not want to have a stand at the trade show but wants to purchase visibility or sponsorship at the event.
Create an additional products page (catalogue page)
After the initial order, you can offer the exhibitor the option to add other products or services: chairs, lighting, furniture, visibility, technical services, etc.
These products can be presented on a dedicated page, accessible from the partner space. This page works like an additional shop: the partner can place one or more complementary orders independently of their initial order.
This page can also be opened to partners who are not part of the commercialisation journey with a stand. For example, a partner without a stand can purchase a visibility or sponsorship service via this dedicated page.
Step 4: Configure the exhibitor journey
The exhibitor journey can be configured with or without pre-registration, depending on whether you want to validate requests beforehand or allow exhibitors to complete their file directly from the partner space.
Choose your journey: with or without prior validation
Two configurations are possible depending on the desired journey:
- With organiser validation: the request appears in the back office with the Prospect status. The organiser can then approve or reject the request from the file page. Once the request is approved, the prospect becomes an exhibitor and can access their exhibitor space to complete their commercialisation file. If the request is rejected, the prospect does not continue the exhibitor journey. Depending on your event configuration, an email may be prepared to inform them of the decision.
- Without prior validation: the contact directly accesses their exhibitor space after their first login. They can then complete their commercialisation file without prior validation by the organiser.
Create the pre-registration form
The pre-registration form lets you collect participation requests before giving access to the full exhibitor file. It is useful if you want to validate applications before a prospect officially becomes an exhibitor at your event.
To create the pre-registration page, go to the back office of your event, then to Website & App > Site content. Then add a new page in the website pages, for example named Partner registration form.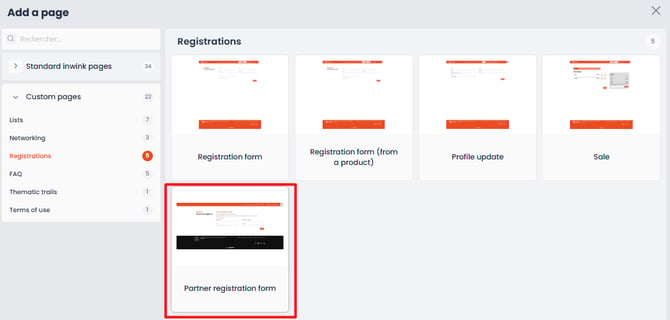
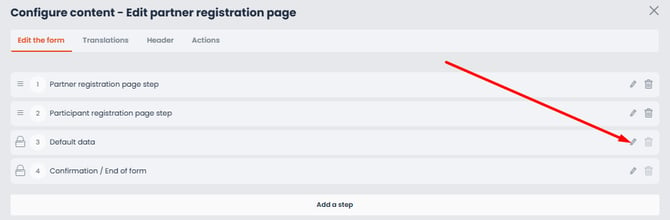
Once the page has been created, modify it by editing the form.
The pre-registration form is structured into several steps:
-
Partner information: this step is used to collect information related to the exhibiting company.
-
Participant information: this step is used to identify the main contact in charge of the exhibitor file.
-
Default values: the Commercialisation Status field is used to determine the status automatically assigned to a request when a form is submitted.
Use the commercialisation status
There are different values for the Commercialisation status field, created by default in inwink:
- Prospect: the pre-registration request has been submitted and must be approved or rejected by the organiser from the event back office.
- Rejected prospect: the participation request has been rejected by the event organiser. The prospect does not continue the exhibitor journey, but their file remains in the back office. The organiser can change the status at any time and switch it to exhibitor.
- File to complete: the exhibitor accesses their exhibitor space to complete their commercialisation file.
- Completed file: the exhibitor has finalised their file and can modify their order at any time.
- Contract signed: the exhibitor can no longer make changes to their order.Contract validated:
If you want to validate each request before giving access to the exhibitor space, add the value “Prospect” as the default value.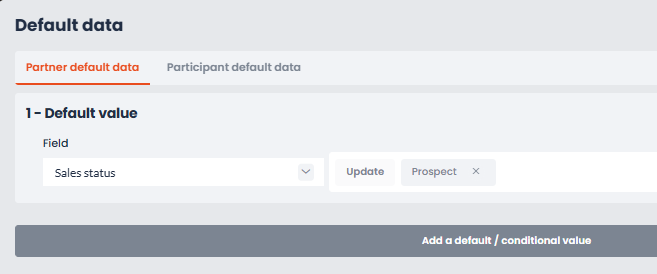
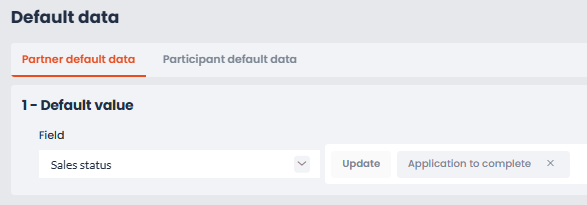
If you do not want to validate each request manually, add the value “File to complete” as the default value.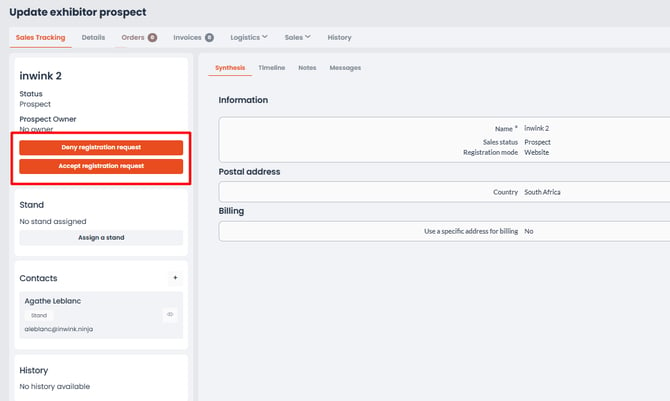
Create the exhibitor form / exhibitor file
A second form, called Exhibitor file, is available in the exhibitor space of your event.
This form lets the approved exhibitor complete their commercialisation file: company information, contacts, offer selection, additional products or items required for participation.
This page is not available by default in inwink. First create a blank web page in your partner space. Then contact your CSM.
Once the prospect has been approved by the organiser, they become an exhibitor and can complete this form from their exhibitor space.
This form is editable, so you can customise it.
You can add different steps. The exhibitor form can be composed of several steps depending on the desired journey.
- Stand selection (mandatory): this step lets the exhibitor select their stand, surface area or package as part of their initial order. Depending on your configuration, you can offer several stands to choose from, with different surface areas, prices or associated products. You can also use a common stand if all exhibitors must access the same offer or journey, without differentiating by stand type.
⚠️ As this step is part of the initial order, we recommend avoiding major changes once the journey has been activated, to prevent inconsistencies in ongoing orders.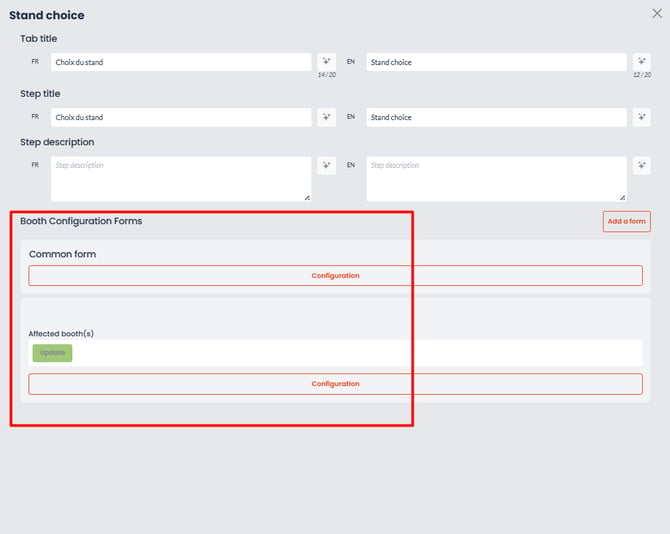
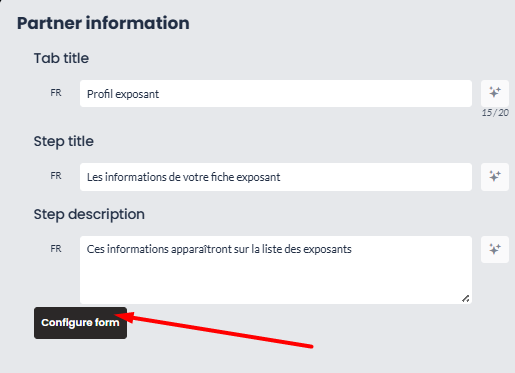
- Exhibitor profile (mandatory): this step lets you collect information related to the exhibiting company: description, logo, sector of activity, contacts, administrative information or elements required to prepare the event.
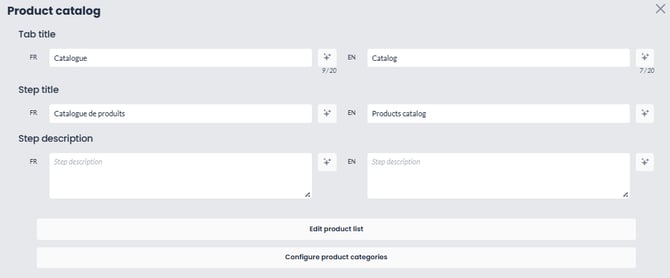
- Catalogue: this step lets you present the products available when the stand is selected. These products may be included, optional, mandatory or correlated with the surface area. Visuals can be added to make the catalogue easier for exhibitors to read.
Warning: Because the stand selection step is part of the initial order, we recommend not changing it too much once the journey has been activated, to avoid inconsistencies in ongoing orders.
Step 5: Prepare contracts, invoicing and emails
Manage contracts and invoicing
The exhibitor contract can be generated from the information entered in the exhibitor file and the items selected in the order.
Once the contract has been signed or validated, invoicing can be triggered according to the process defined for your event. This point depends on your configuration and should be clarified with your CSM, especially if you want to use Pennylane or another invoicing tool.
The exhibitor then finds their invoices in a dedicated tab in their exhibitor space.
When Pennylane is used, the invoice is issued from Pennylane and the client has a dedicated account to access their invoicing elements.
For the organiser, invoicing information can be consulted from the inwink back office, in the dedicated area: Commercialisation > Invoices.
If you do not use Pennylane, or if you do not want to use it, this does not prevent you from setting up the Commercialisation module. The exact invoicing process simply needs to be defined beforehand with your CSM.
Create your emails for each commercialisation step
On the organiser side, you can create different emails related to commercialisation:
-
Pre-registration request received by the organiser (Commercialisation Status = Prospect)
-
Pre-registration request approved (Commercialisation Status = File to complete)
-
Pre-registration request rejected (Commercialisation Status = Rejected prospect)
-
File completed (Commercialisation Status = File completed)
-
Reminder email: file to finalise
-
Contract approved (Commercialisation Status = Contract approved)
-
Contract signed (Commercialisation Status = Contract signed)
-
Contract cancelled (Commercialisation Status = Contract cancelled)
4. Monitor your commercialisation
Monitor exhibitor files on the organiser side
When an exhibitor completes their form from the exhibitor space, their file is available in the event back office, from Commercialisation > All files.
The Commercialisation status field lets you monitor the file’s progress. The commercialisation status makes it possible to track the progress of the file precisely, from the pre-registration request to contract validation.
When a contract is validated, the file is considered confirmed in the commercialisation journey. The organiser can then track the elements associated with the file: initial order, selected products, contract and, depending on the configuration, invoicing information.
When the exhibitor starts entering their information, the file moves to the File to complete status. You can open the file to view the information already entered.
As long as the exhibitor has not finalised their file, the status remains unchanged.
Once the file is completed and the order is validated by the exhibitor, the status changes to Completed file.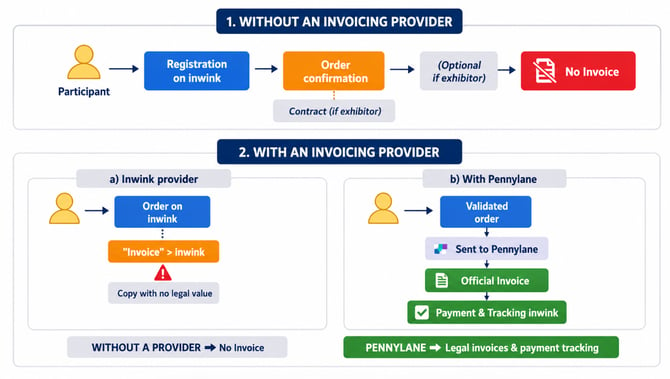
Monitor exhibitor files on the exhibitor side
The exhibitor completes their exhibitor file in their space. They are free to select products, purchases and so on. Once completed, they can modify their order at any time, except once the contract has been signed.
The exhibitor can find all their invoices in a dedicated tab in their exhibitor space.
Monitor exhibitor orders
The order groups together the items selected by the exhibitor: stand, surface area, pack, included products or additional options.
Depending on your configuration, the exhibitor can complete their order from their space, view the summary, add services or validate their participation.
As long as the contract has not been signed, some information can still be modified. Once the contract has been signed, changes are generally more controlled in order to secure commercial and administrative tracking.
To sign a contract, the exhibitor must have the “Stand manager” role.
Once the order has been signed on the exhibitor side, the organiser is the only person who can act on the order. The organiser then has several options:
- validate the contract on their side
- modify the order, which reopens it
- create an additional order for the exhibitor directly, either on invoice or with an online payment link
- cancel the order.
This step secures the commercial journey while still allowing the organiser to correct or adjust an order if needed.
All orders are visible in the Orders tab of your back office.
The number of lines corresponds to the number of products added by the exhibitor when placing their order: products and additional products.
The Orders tab lets you find orders placed as part of the commercialisation process, as well as the products added to these orders. The number of lines can therefore correspond to the different products selected by the exhibitor, whether included, optional or additional products.
Monitor contracts and invoices
The exhibitor can find all their invoices in a dedicated tab in their exhibitor space. On the organiser side, invoices are accessible from Commercialisation > Invoices, depending on the configuration selected for your event.
5. Use the different floor plans
Use the commercial floor plan (beta version)
The commercial floor plan lets you manage stand allocation from a commercial perspective.
It helps organiser teams view available locations, allocate a stand to an exhibitor, place an option on a location or monitor stands that are already reserved.
This floor plan connects the sale of a stand with its location at the event. It provides a clear view of availability and makes allocation tracking easier.
Use the technical floor plan (beta version)
The technical floor plan helps you prepare the structure of the trade show from an operational perspective.
It can be used to work from a venue floor plan and take on-site constraints into account: aisles, technical areas, pillars, available locations or setup constraints.
The technical floor plan lets you draw, adjust or organise stands before their commercial allocation. It is mainly used by organiser teams to prepare the event floor plan.
Key takeaway: the technical floor plan is used to build and prepare the trade show layout. The commercial floor plan is used to sell, allocate and monitor stands from the commercialisation side.
Floor plan selling (coming soon)
Floor plan selling will make it possible to display available spaces on the event floor plan. Once the exhibitor has a file and an order corresponding to their rights or purchase, they will be able to position themselves on an available location.
The floor plan will then serve as a support to visualise spaces, monitor availability and make stand allocation easier.
6. Reference: detailed description of the tabs
This section follows the back-office menu structure. It is useful as a complement to the configuration guide, to quickly identify what each tab corresponds to.
Exhibitor files
- Dashboard: views displayed in relation to your sales/commercialization setup
- My files: if a sales representative is assigned as the owner of different files, they will find them here (predefined view)
- All files: files accessible to everyone
- Orders: everything that has been sold as part of the sales/commercialization process
- Discount codes: discount codes associated with orders
Products & Packages
- Stand categories: stand categories let you create your stand offers: fixed or variable, with included, mandatory products or products correlated with the surface area in sqm. You can also organise them into parent/child categories, for example: indoor stands > bare stands, equipped stands or premium stands.
- Products: this tab groups together all the products offered as part of the trade show. Products can be included in a stand, associated with an offer, made mandatory, correlated with a surface area, or offered separately as an additional purchase. Products can also be imported to save time during configuration. Products can have subcategories.
Invoicing
- Invoices: all invoices generated for your exhibitors.
- Contracts: all signed contracts, drafts or contracts in progress.
- Contract templates: the default contract template provided. Organisers can customise it.