Important:
Remember to translate the login screens and account creation/ password reset confirmation emails into the languages you set up for the login screen.
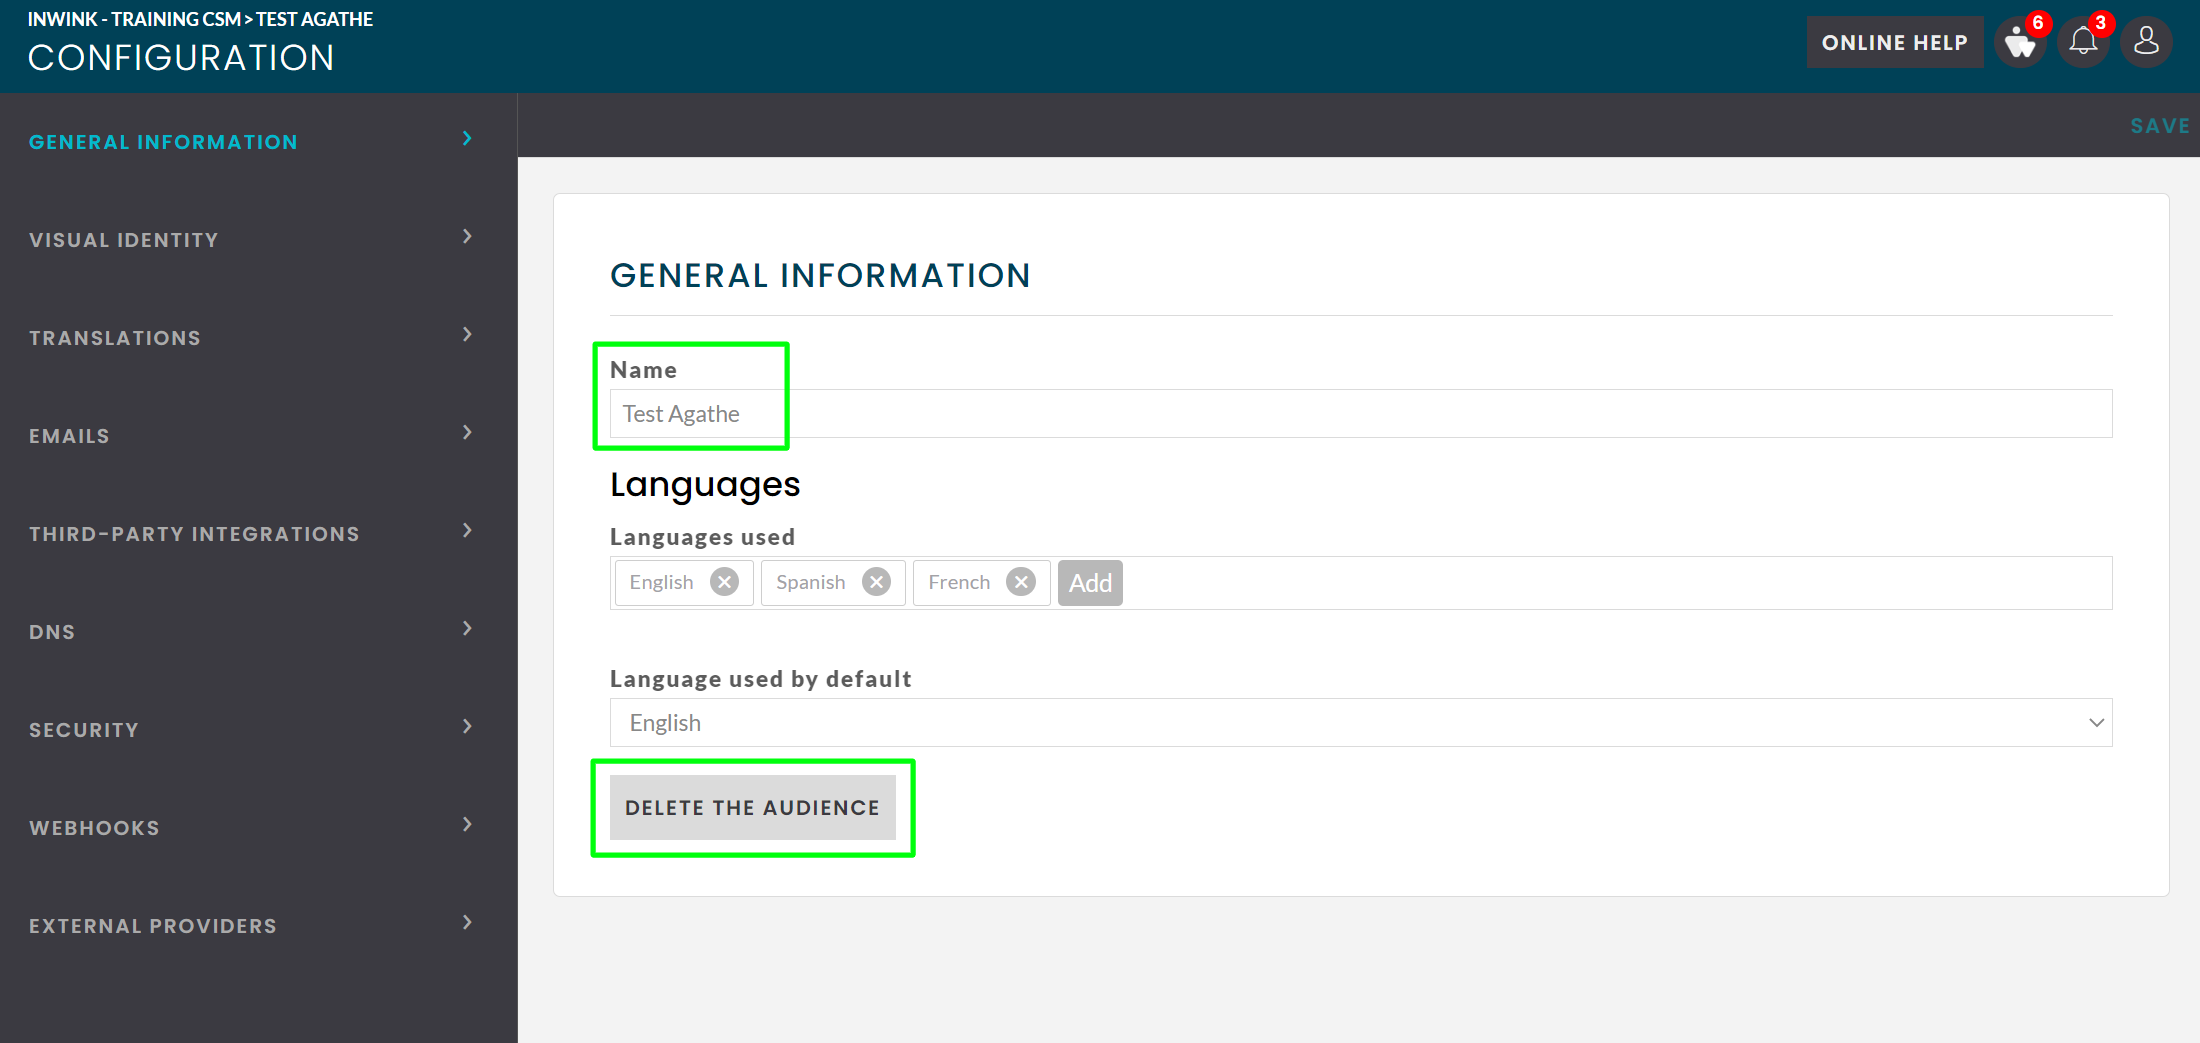
1. General informations
In order to offer your users a login screen in several languages, you must define these languages in the Client Back-Office, in audience > Name of the audience you wish to configure > Configuration > LANGUAGES.
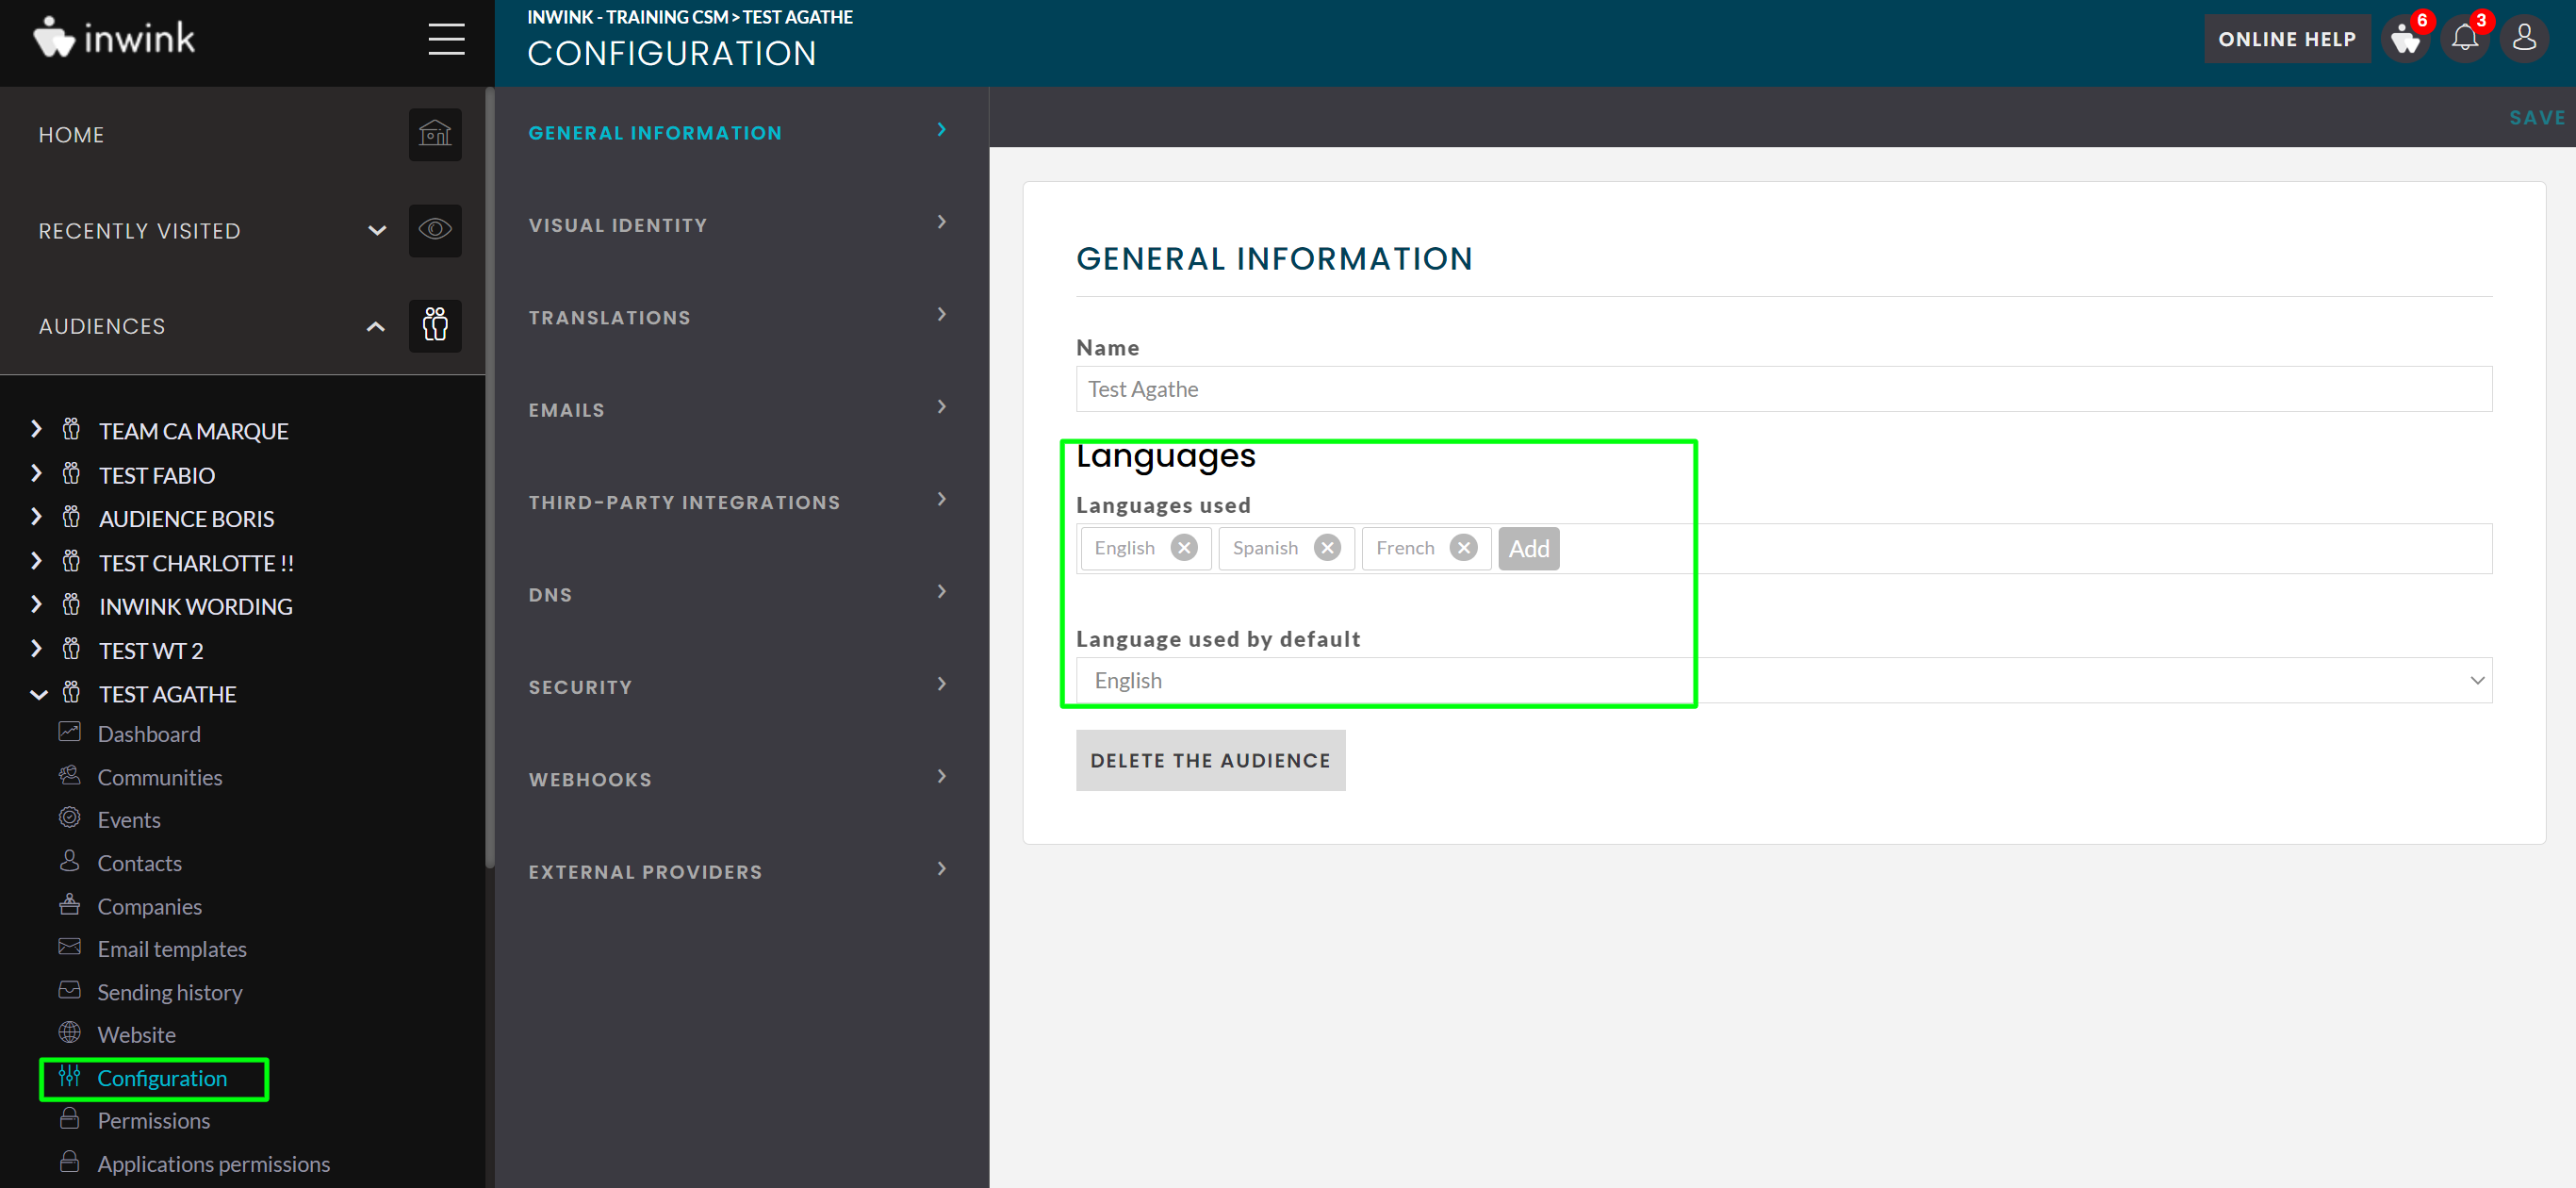
You can change the following settings:
-
Languages Used: First select the language(s) in which you want to offer your users to log in.
-
Default Language Used: Select the default language for the login screen associated with the user account group you are configuring. If the user's browser on the login screen is set to a language that is not one of the languages you selected above in the Languages Used field, the login screen will display in the language selected here on the user's browser.
This is also where you can rename or delete your audience.
Remember to click on SAVE in the top right-hand corner of the screen once the settings have been made.
Important :
Remember to translate the login screens and the account creation / password reset confirmation emails into the languages you have selected on this screen.
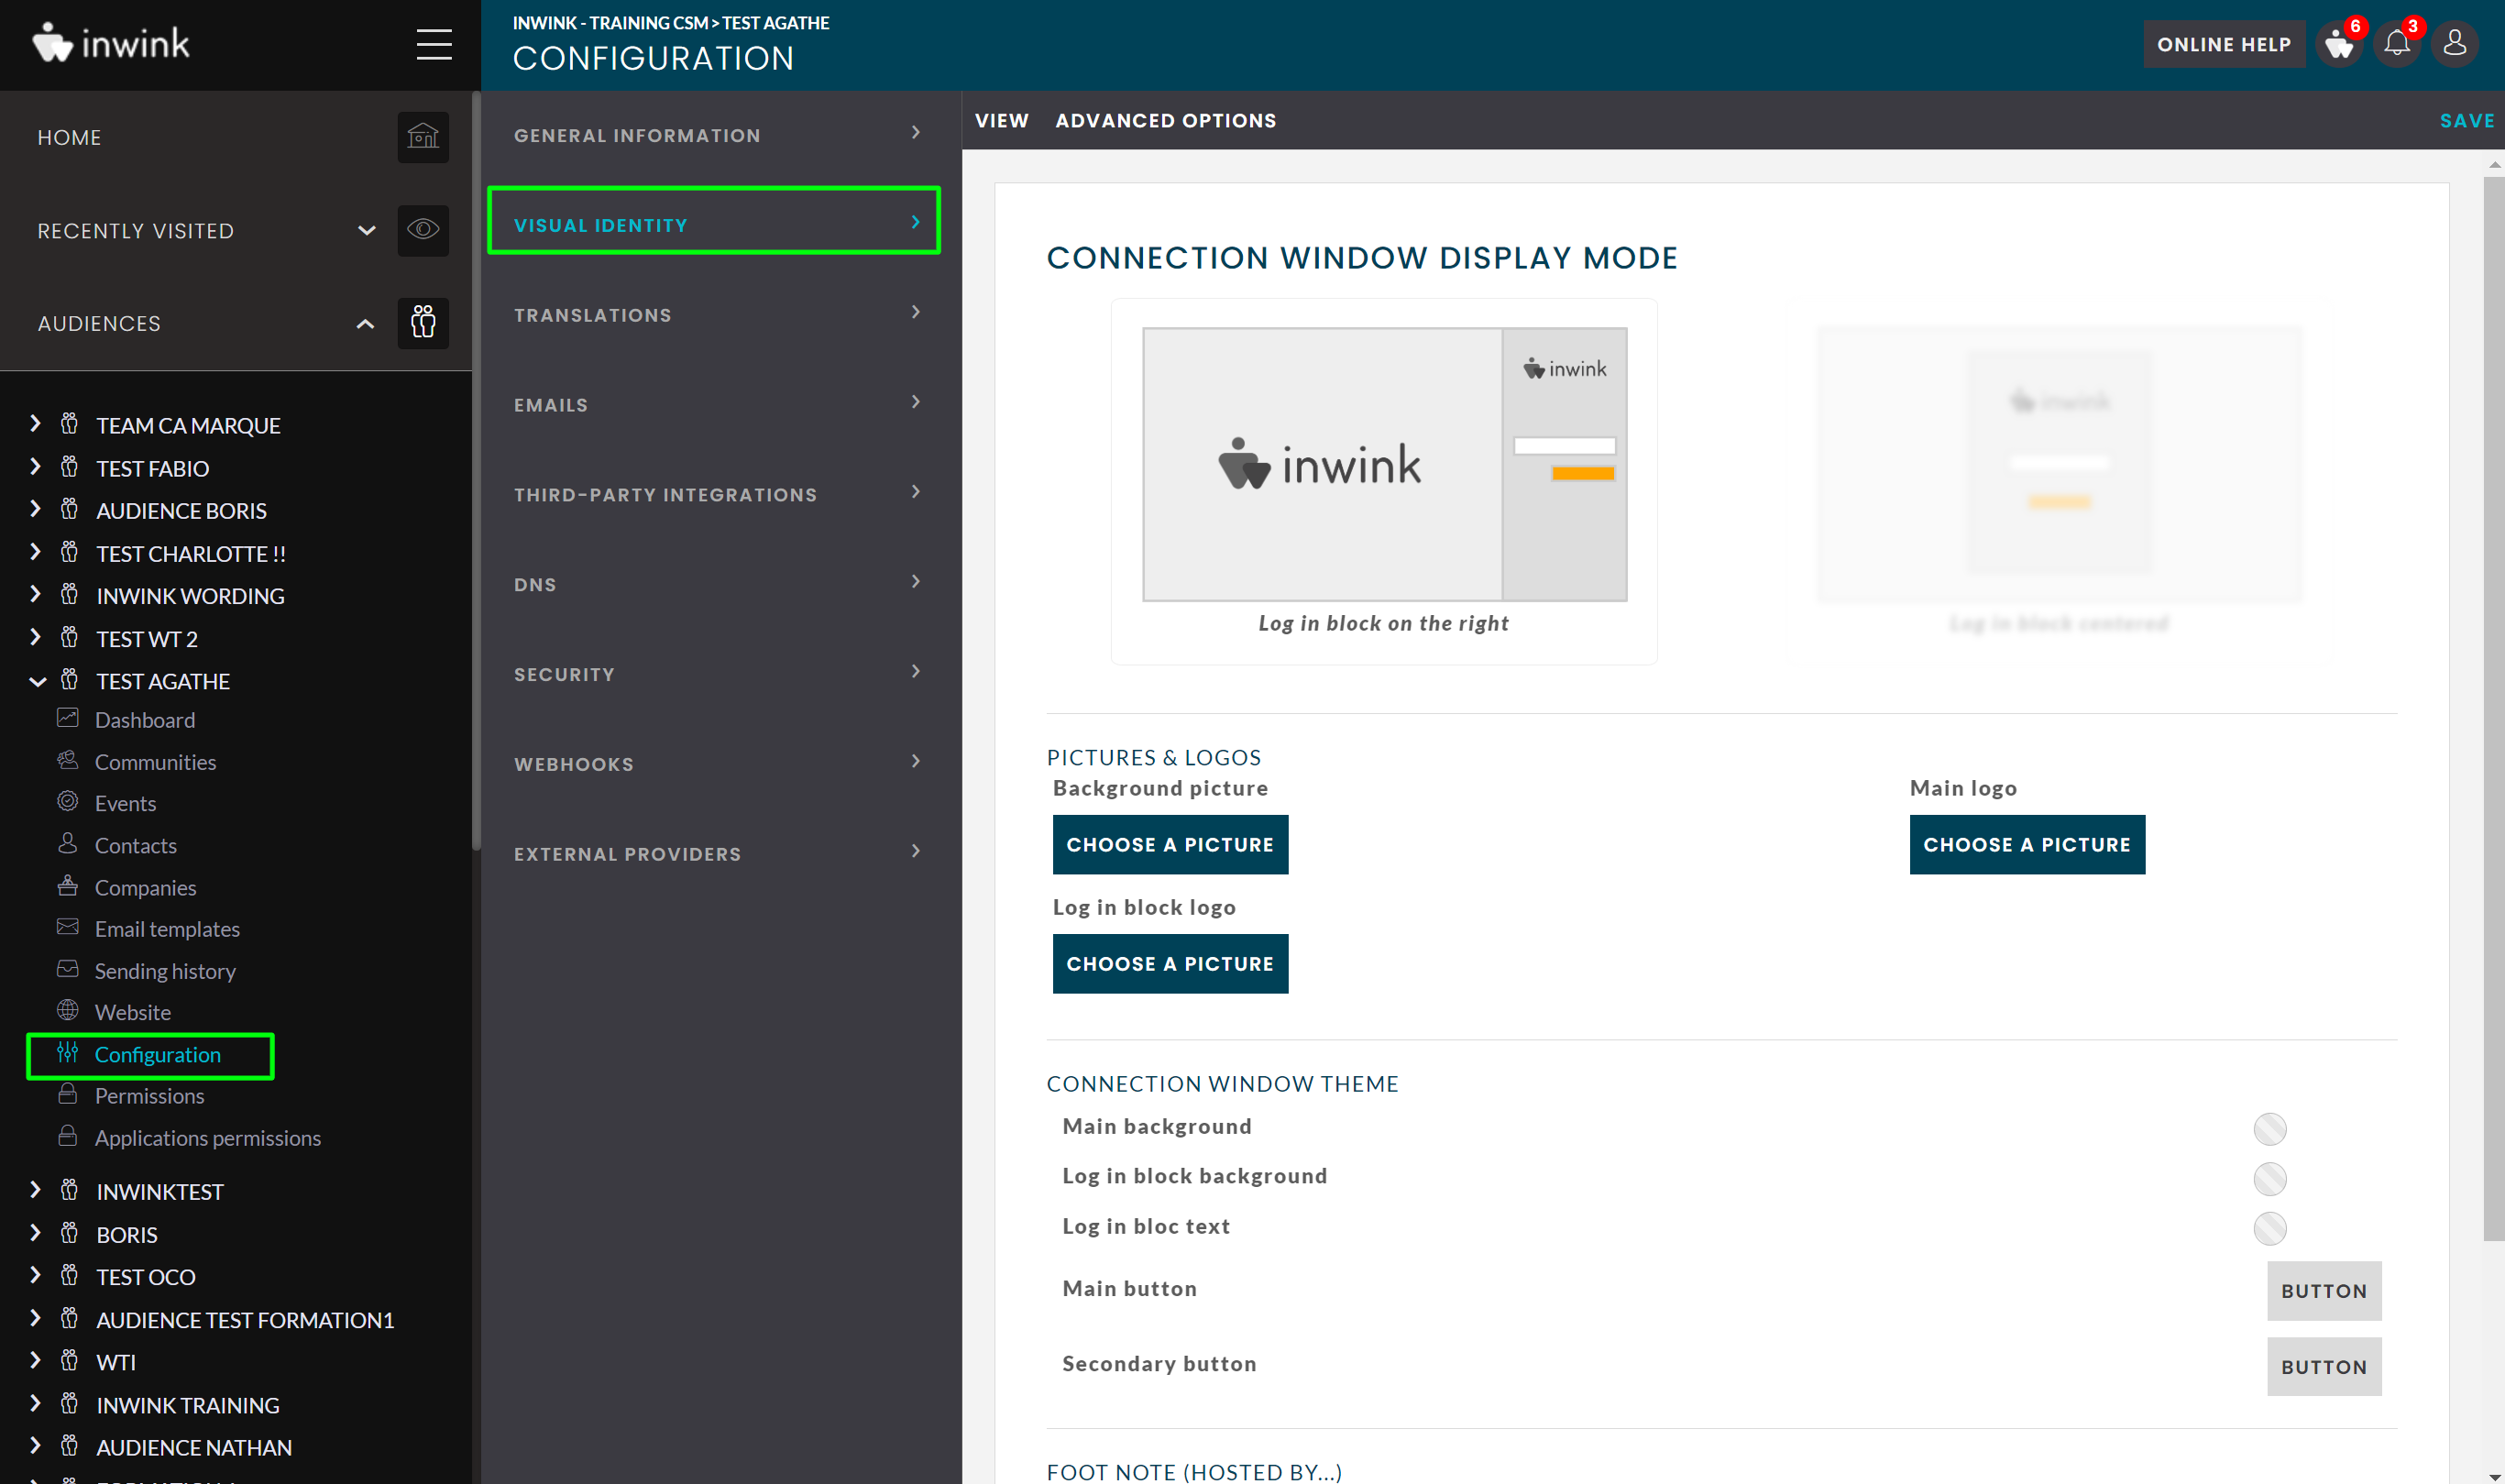
2. Visual identity (of the login screen)
When your participants log on to your website, they go through a login page where they enter their email and password.
This page is fully customizable visually.
To do this, from your client back office:
- Click on the Audience you wish to modify
- Click on the menu Visual Identity
This menu is divided into 3 submenus:
- Display mode of the login page
- Images & logos
- Theme of the login page
How the login page is displayed
When the participant arrives at this page, he/she will enter his/her email address, then his/her password.
You can choose to put the authentication block in the middle of the page or on the right side of the page.
On mobile, the block will always be full screen.
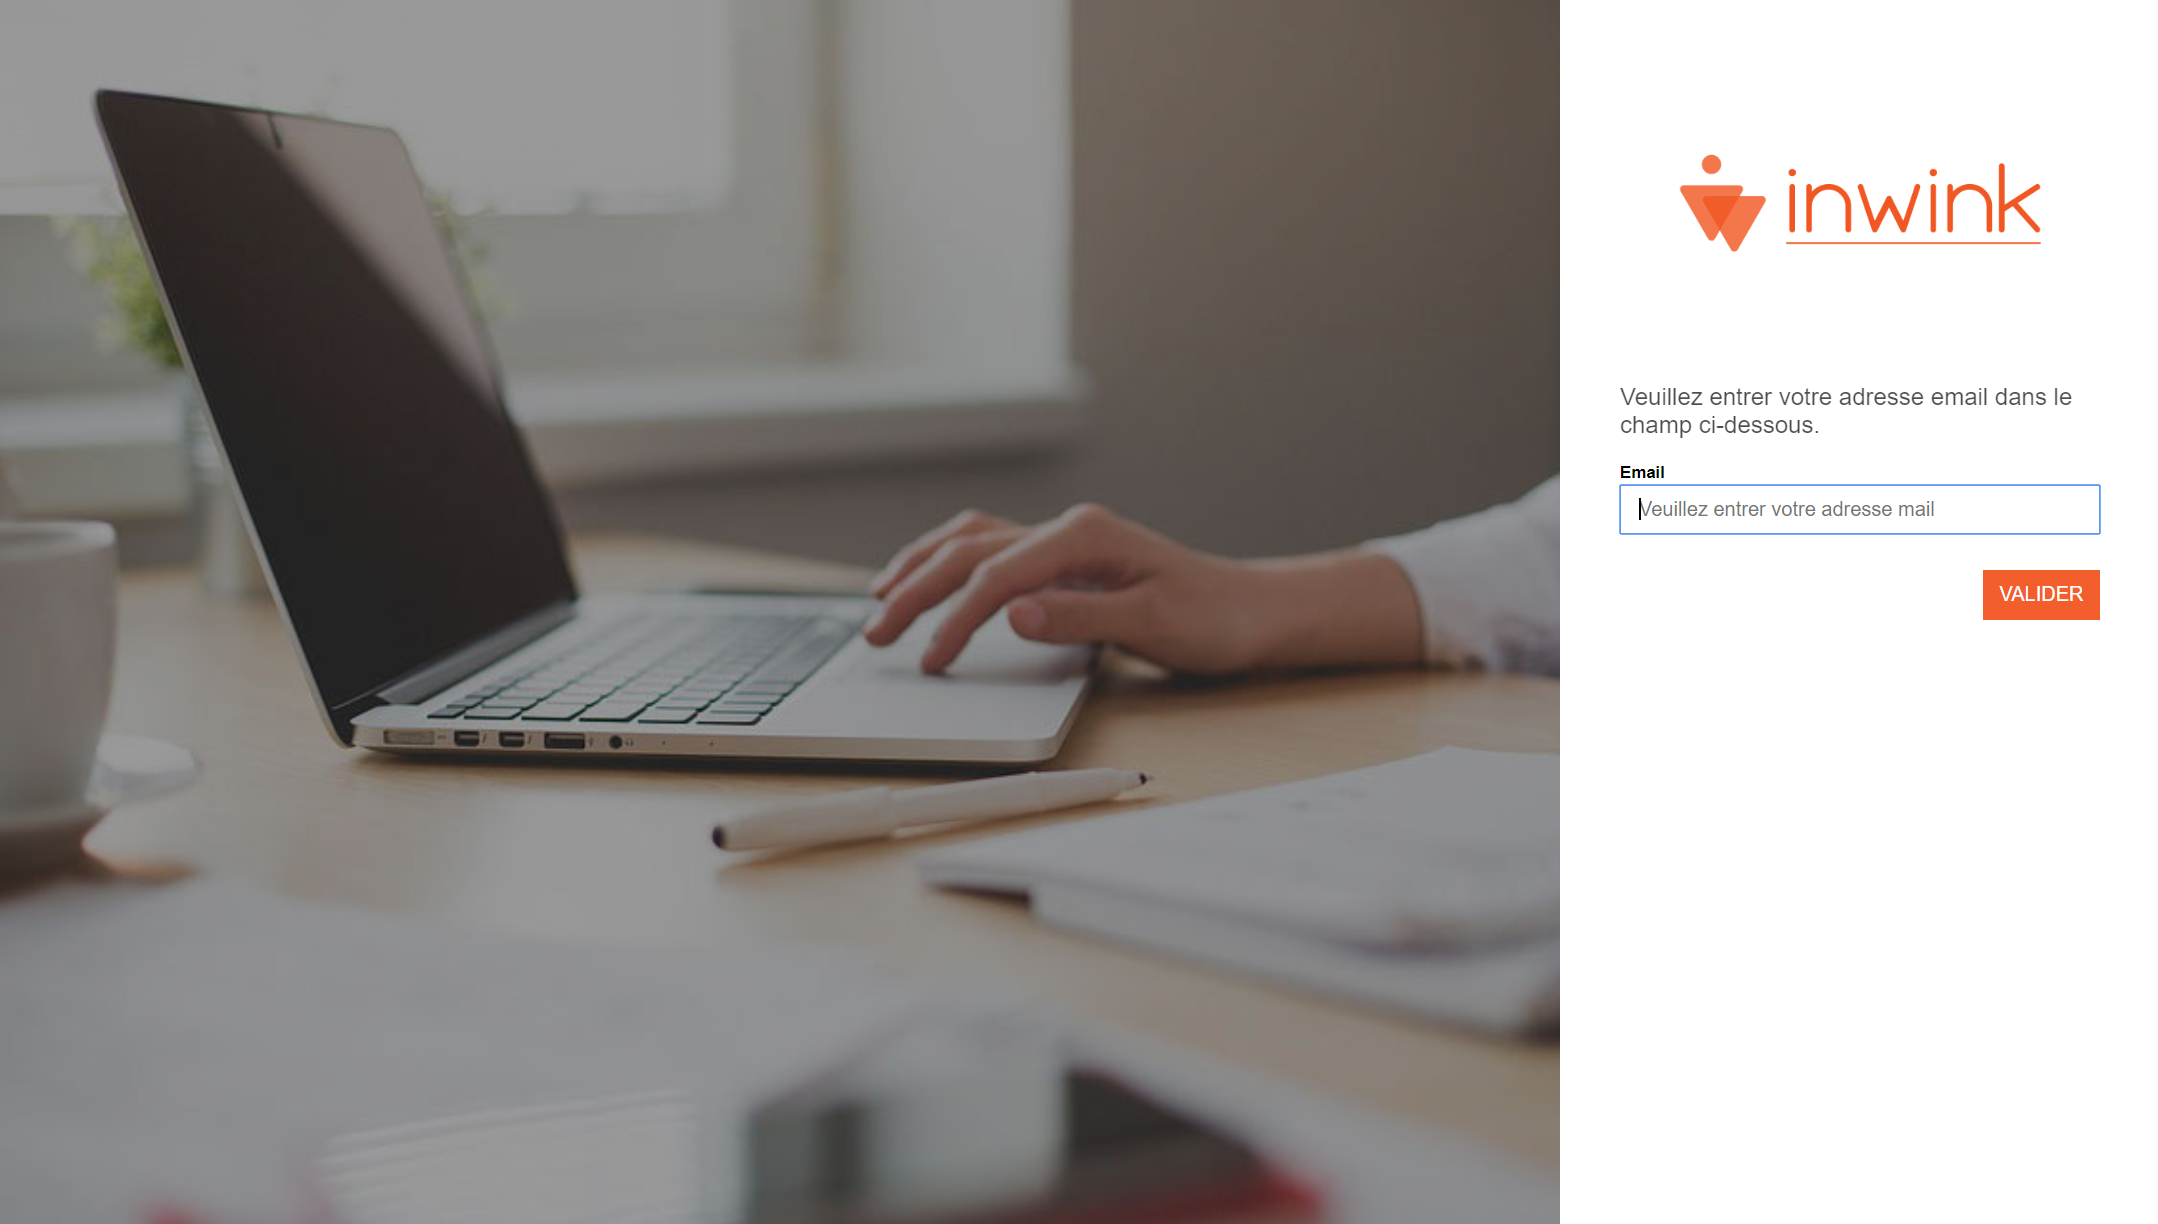
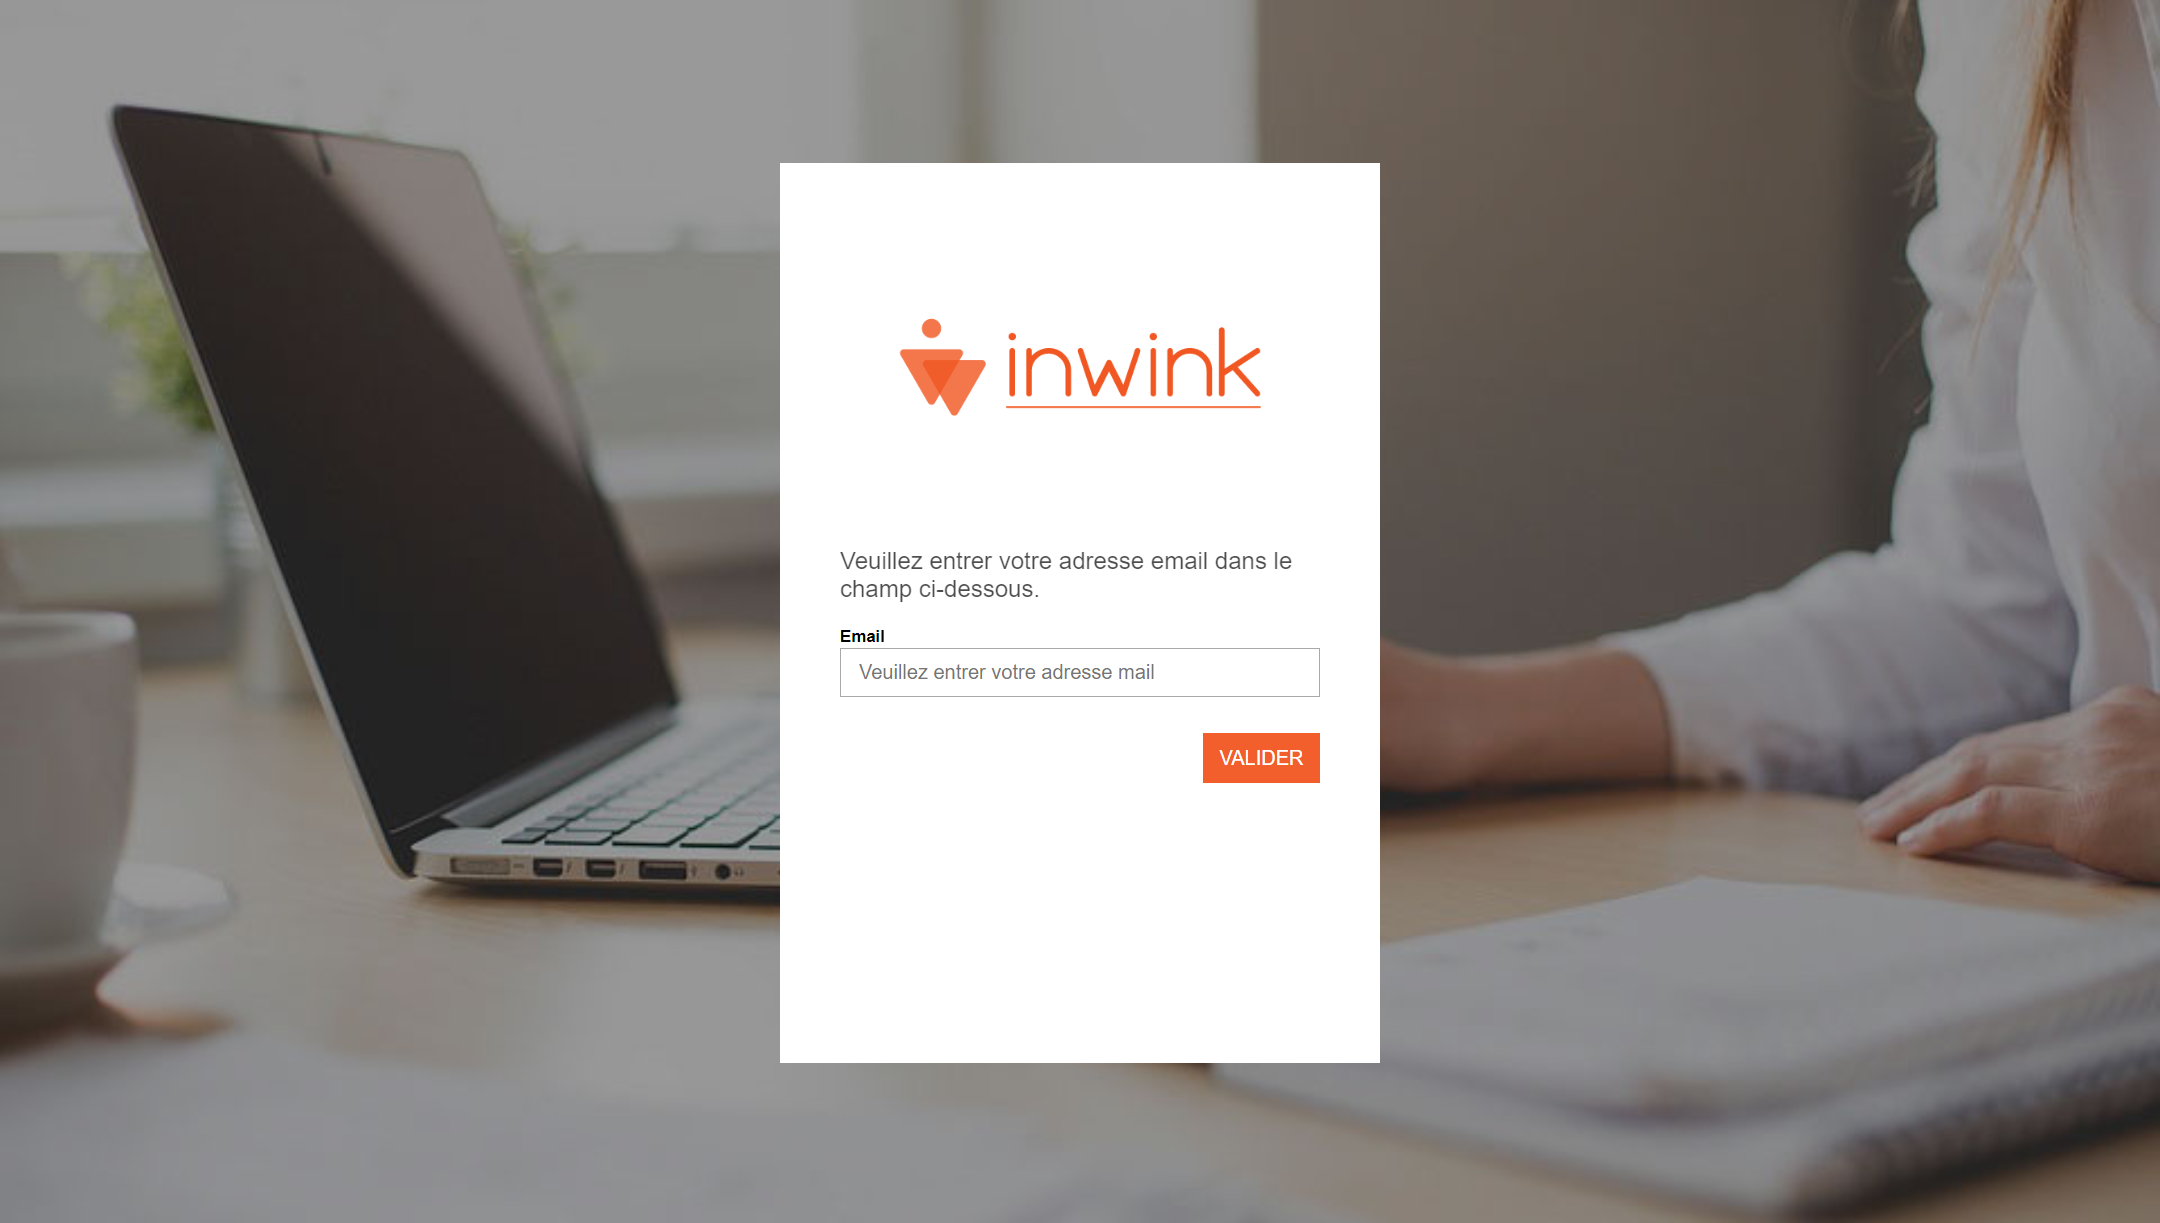 Authentication block center
Images & logos
On the login page, you can :
- Put a background image (PNG, recommended size: 1920px*980px)
- Put a logo on the authentication block, above the text (PNG, recommended size: 500px*250px)
- Put a main logo, on the background image (PNG, recommended size: 600px*600px)
- If your authentication block is in the middle of the page, this logo will not be visible
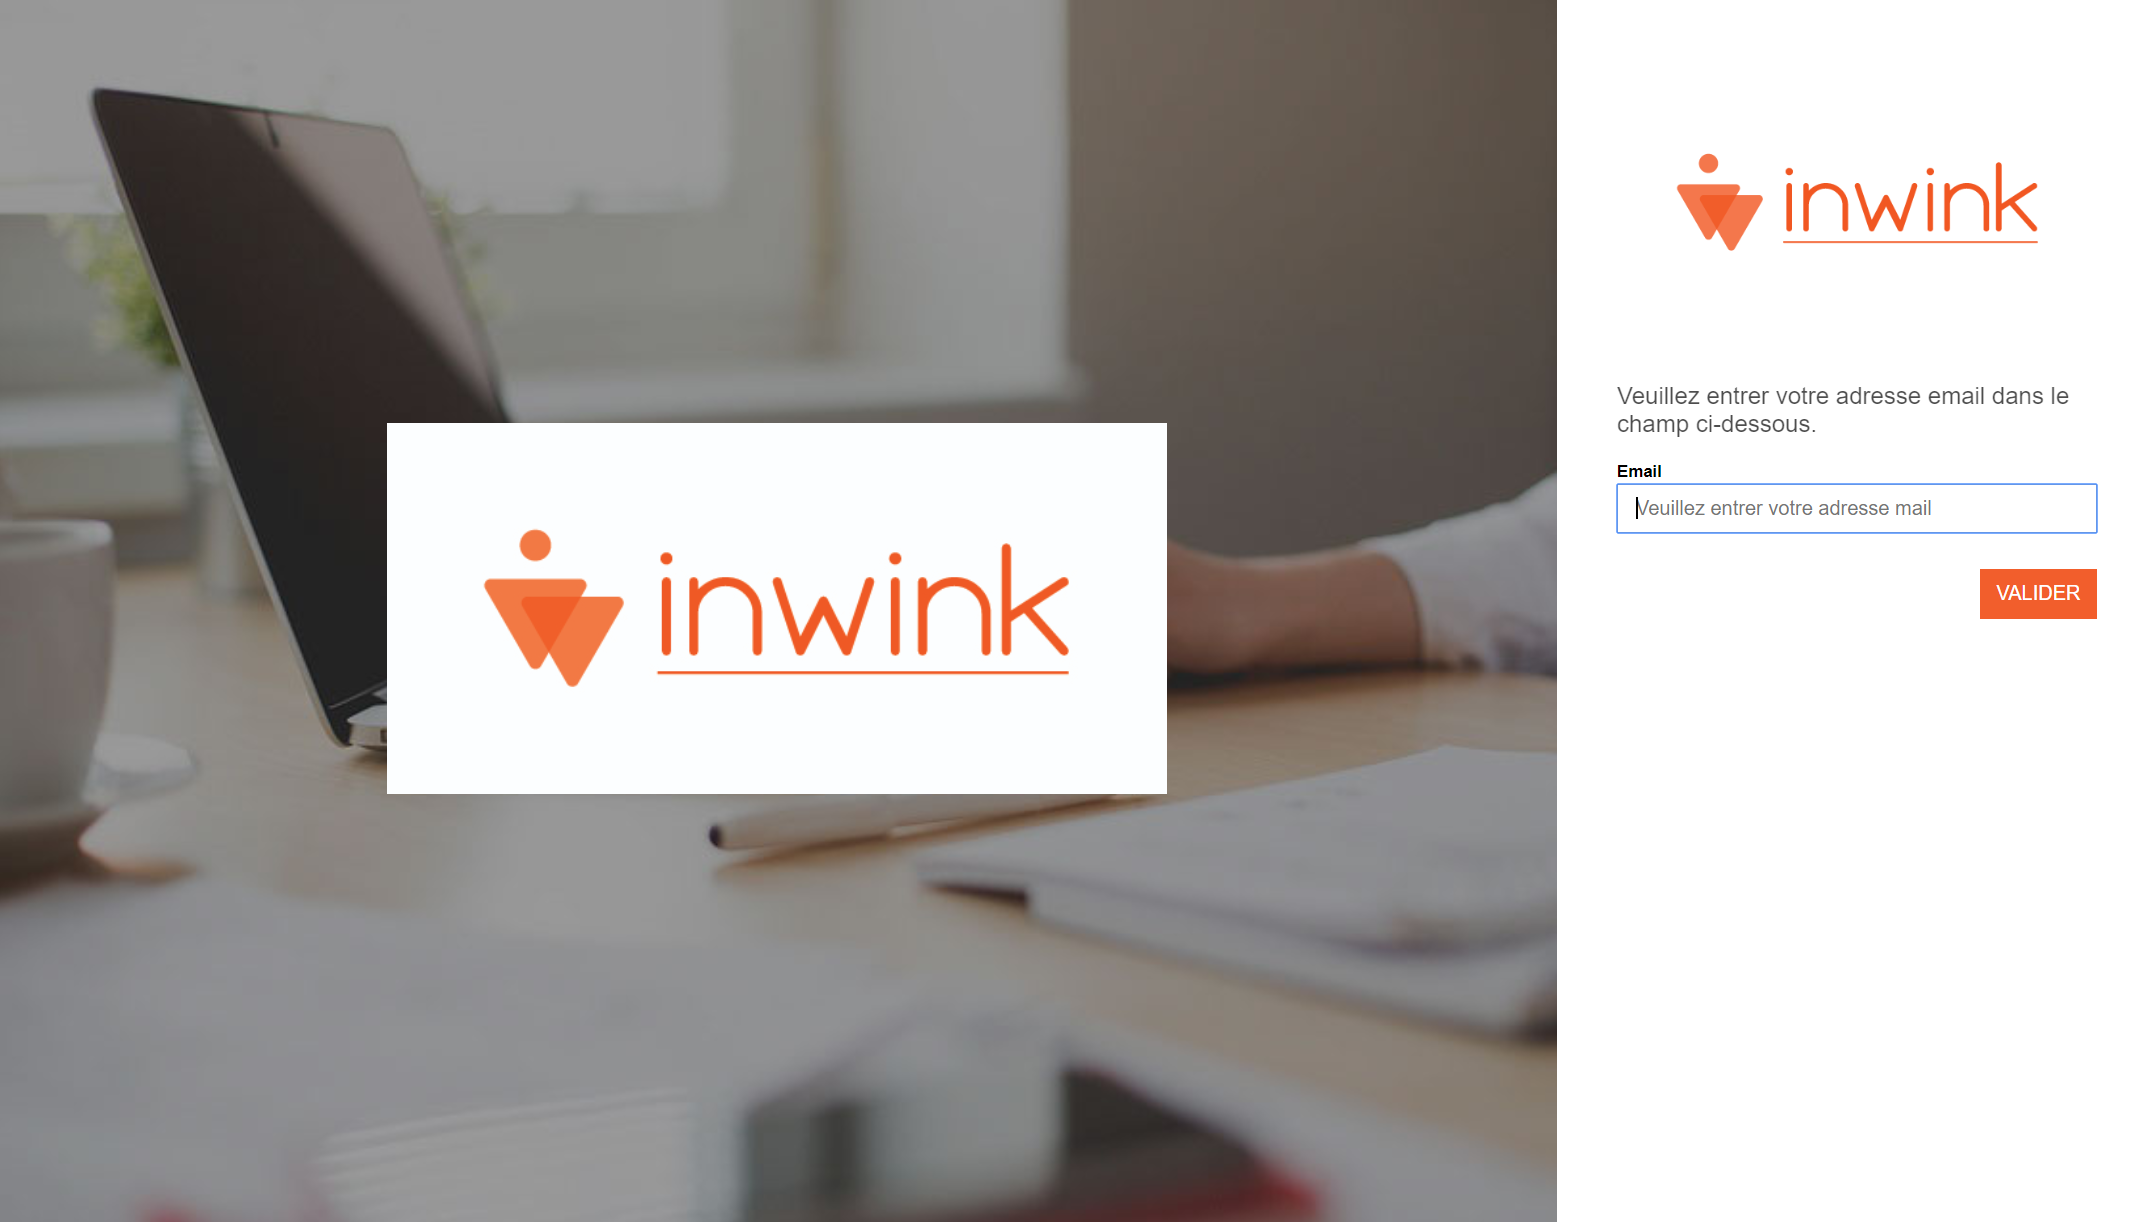 Implementation of the main logo and authentication block logo
- If your authentication block is in the middle of the page, this logo will not be visible
Login page theme
In this menu, you can customise the colours of the page, so that it matches your corporate identity.
You have five options:
- Main background
- If you do not want to add a background image to your page, you can change the colour here.
- If a background image is present, this colour will be ignored
- Authentication block background
- Authentication block text
- Main button (The main buttons are Validate, I connect)
- Secondary button (The secondary button is the Back button)
- We advise you to use a more neutral tone like grey for this button
3. Translations
You can view, edit, export and import all text fields and their translations from a login screen created in the Client Back Office.
The Translation Grid
In the Client Back-Office, click on AUDIENCE > Name of the audience for which you wish to modify the text fields > Configuration > Translations.
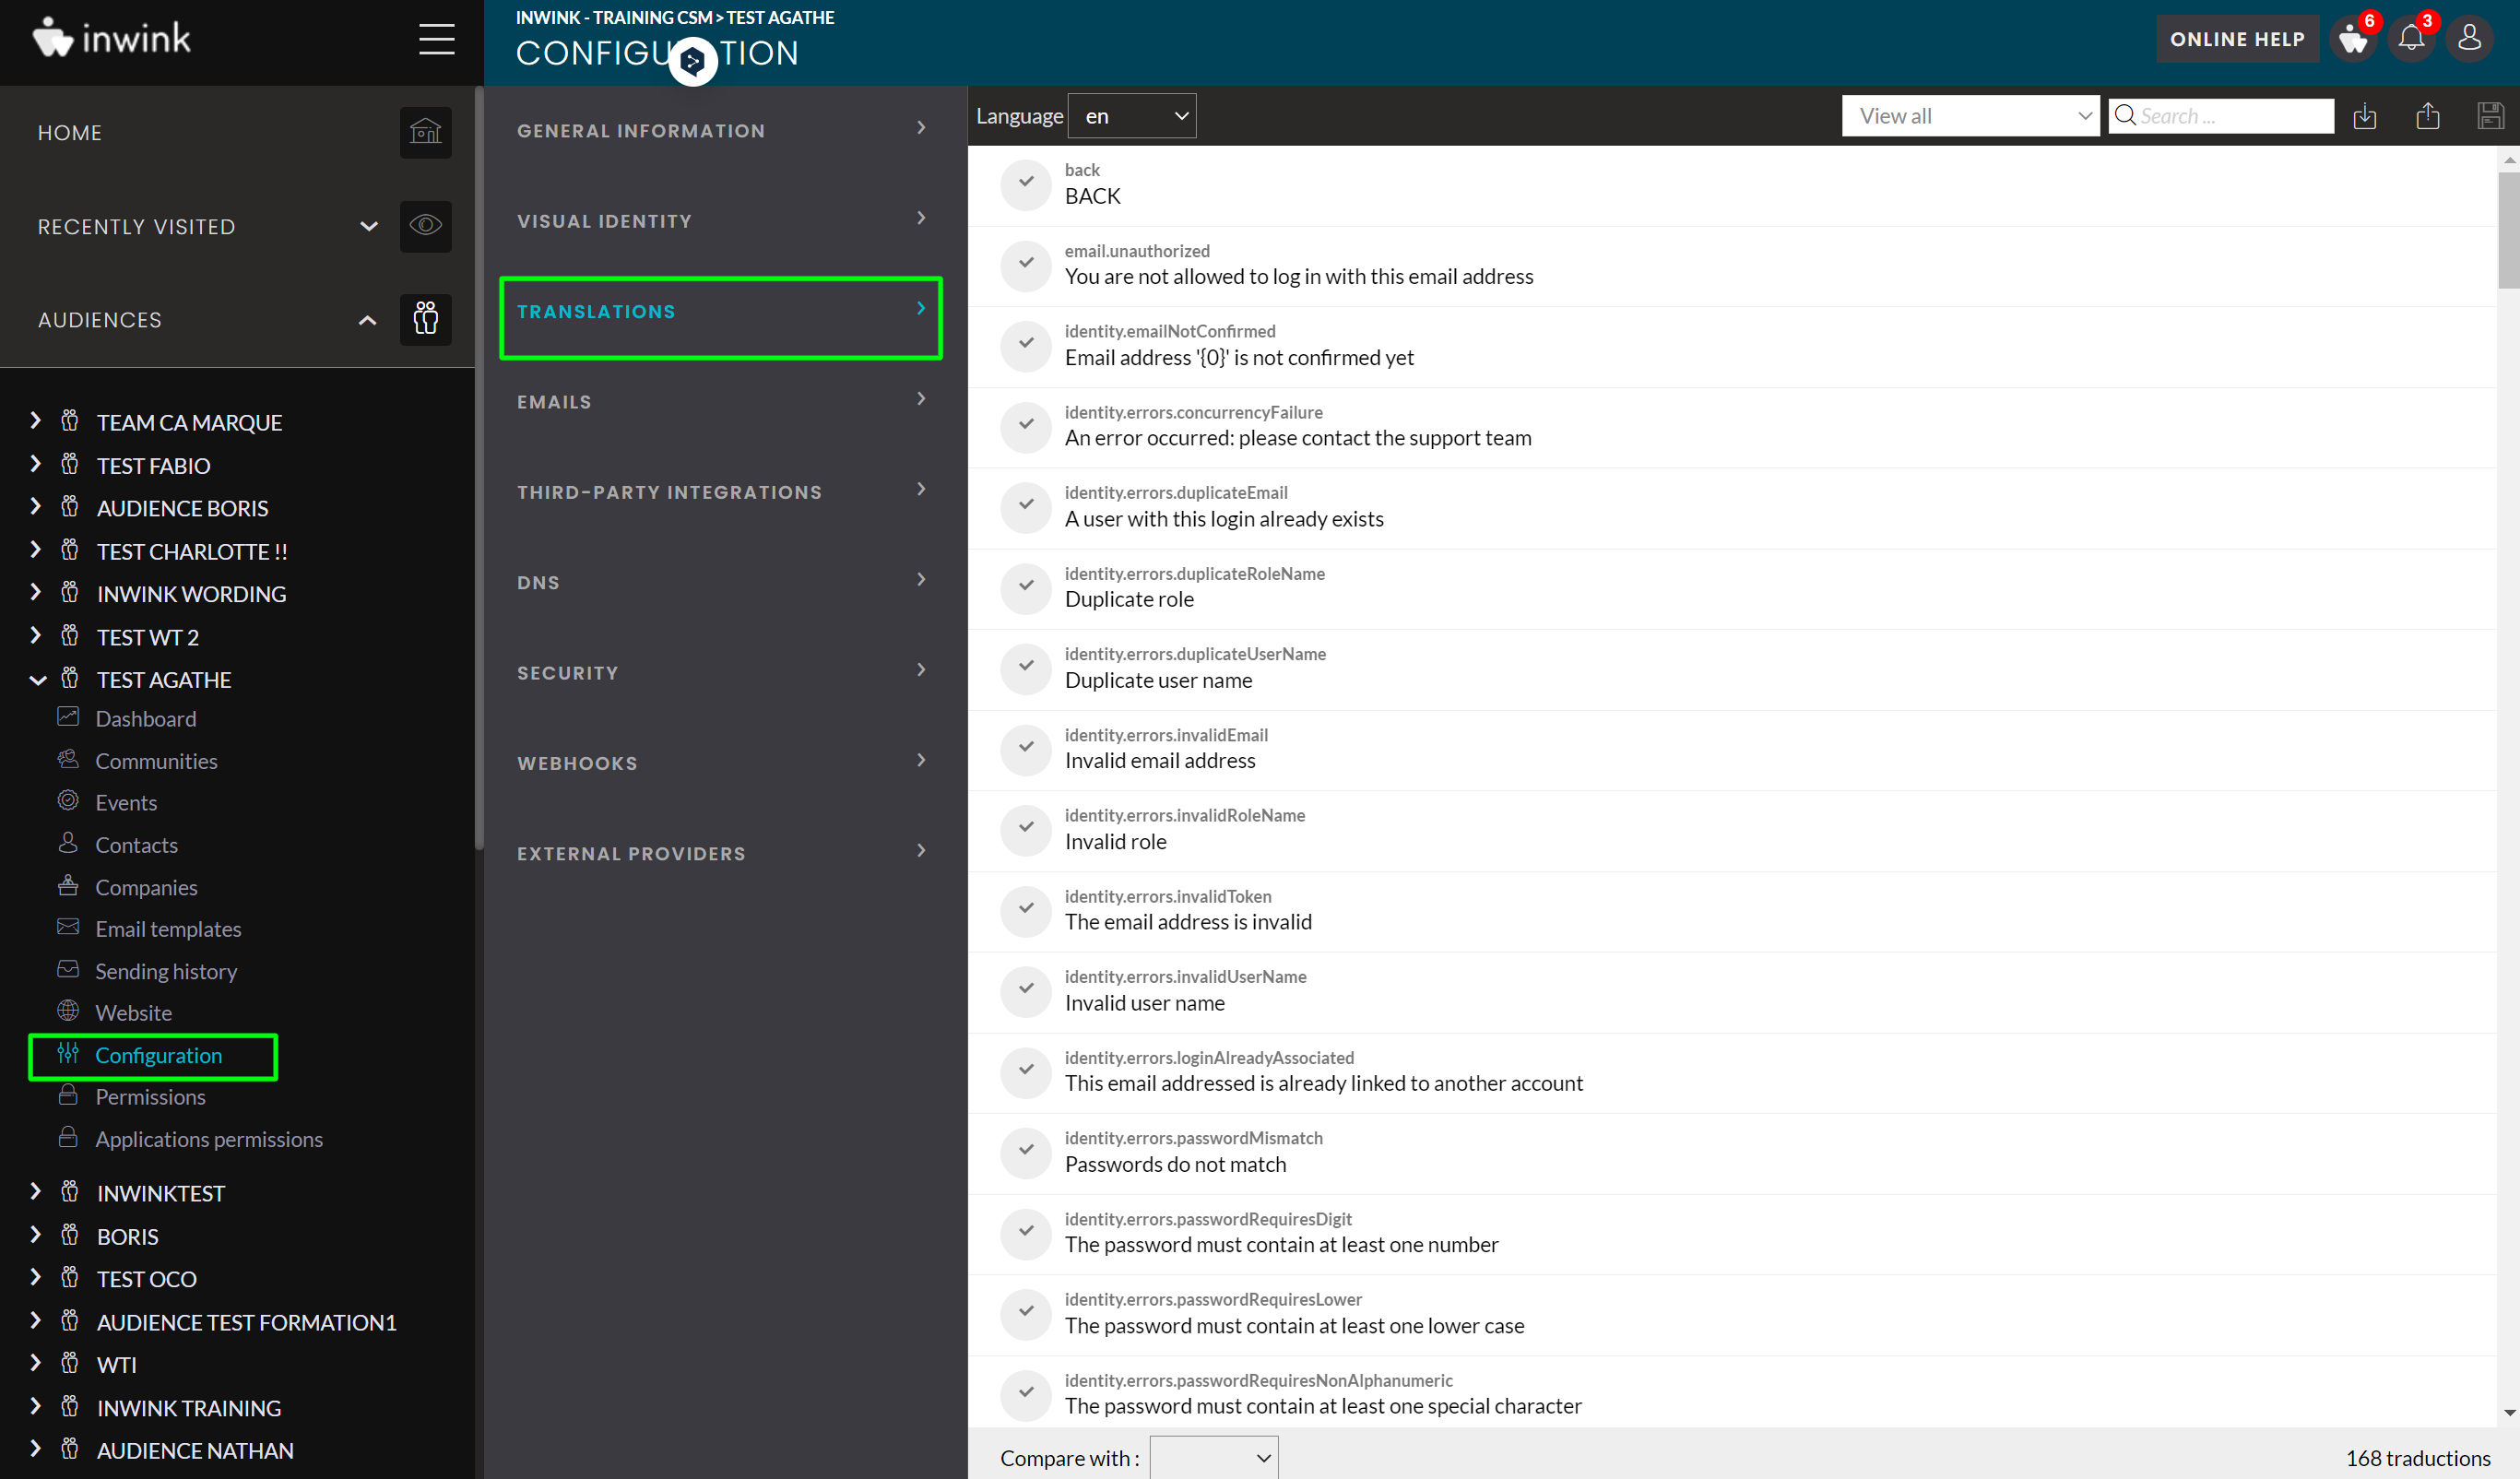
1. Language : Select here the language in which you wish to view the textual content of the login page.
2. Texte : Select here the text fields you wish to display in the grid:
- See all: all fields
- See trads with warning: all text fields for which inwink raises an alert
- See trads not filled in: all fields for which no translation is filled in
3. Text search : Search for a text field and its translation by entering its content or technical code here and clicking once on the magnifying glass.
4. Import translations: Import here the translations you have collected from an Excel file.
The Excel file must contain the technical codes of the fields to be imported in the first column. To export the list of these technical codes, see point 6.
5. Export translations : Export all the fields present in your login screen with their technical codes and translations already present in the Client Back-Office.
6. Save : Once you have modified your translations (manually or by import), please remember to save
7. Manual modification : You can also edit the translations manually by clicking on the line where the translation you want to edit is located.
It is advisable to use the translation import to keep track of what you are editing.
4. Email
Once your inwink back-office is created and your audience is created. You have the possibility to create a common email for :
- An account confirmation email
- An email for forgotten password with code
- A manual password forget email
These email is similar to your event emails, they include
- A sender name
- A sending email address
- A reply email address
- A subject
- An email body
To create this email, go to your client back office: To create this email, go to your client backoffice: AUDIENCE > Name of the audience for which you wish to modify the text fields > Mail template> +
This email contains an authentication code that will be sent to participants when they create their account or if they forget their password.
The body of the email is already created for ease of editing, but you can update that as well.
Please remember that :
- The authentication code must not be changed, you can change the text but not the code.
- This email, sent when you log in and forget your password, is used on all the events of your audience, we advise you to keep it generic, and not in the colours of a particular event.
The mail body is already created for easy editing, but you can update it too.
Once you have created this email in the email template grid, go to > AUDIENCE > Name of your audience > CONFIGURATION > EMAIL > select your authentication email > SET UP
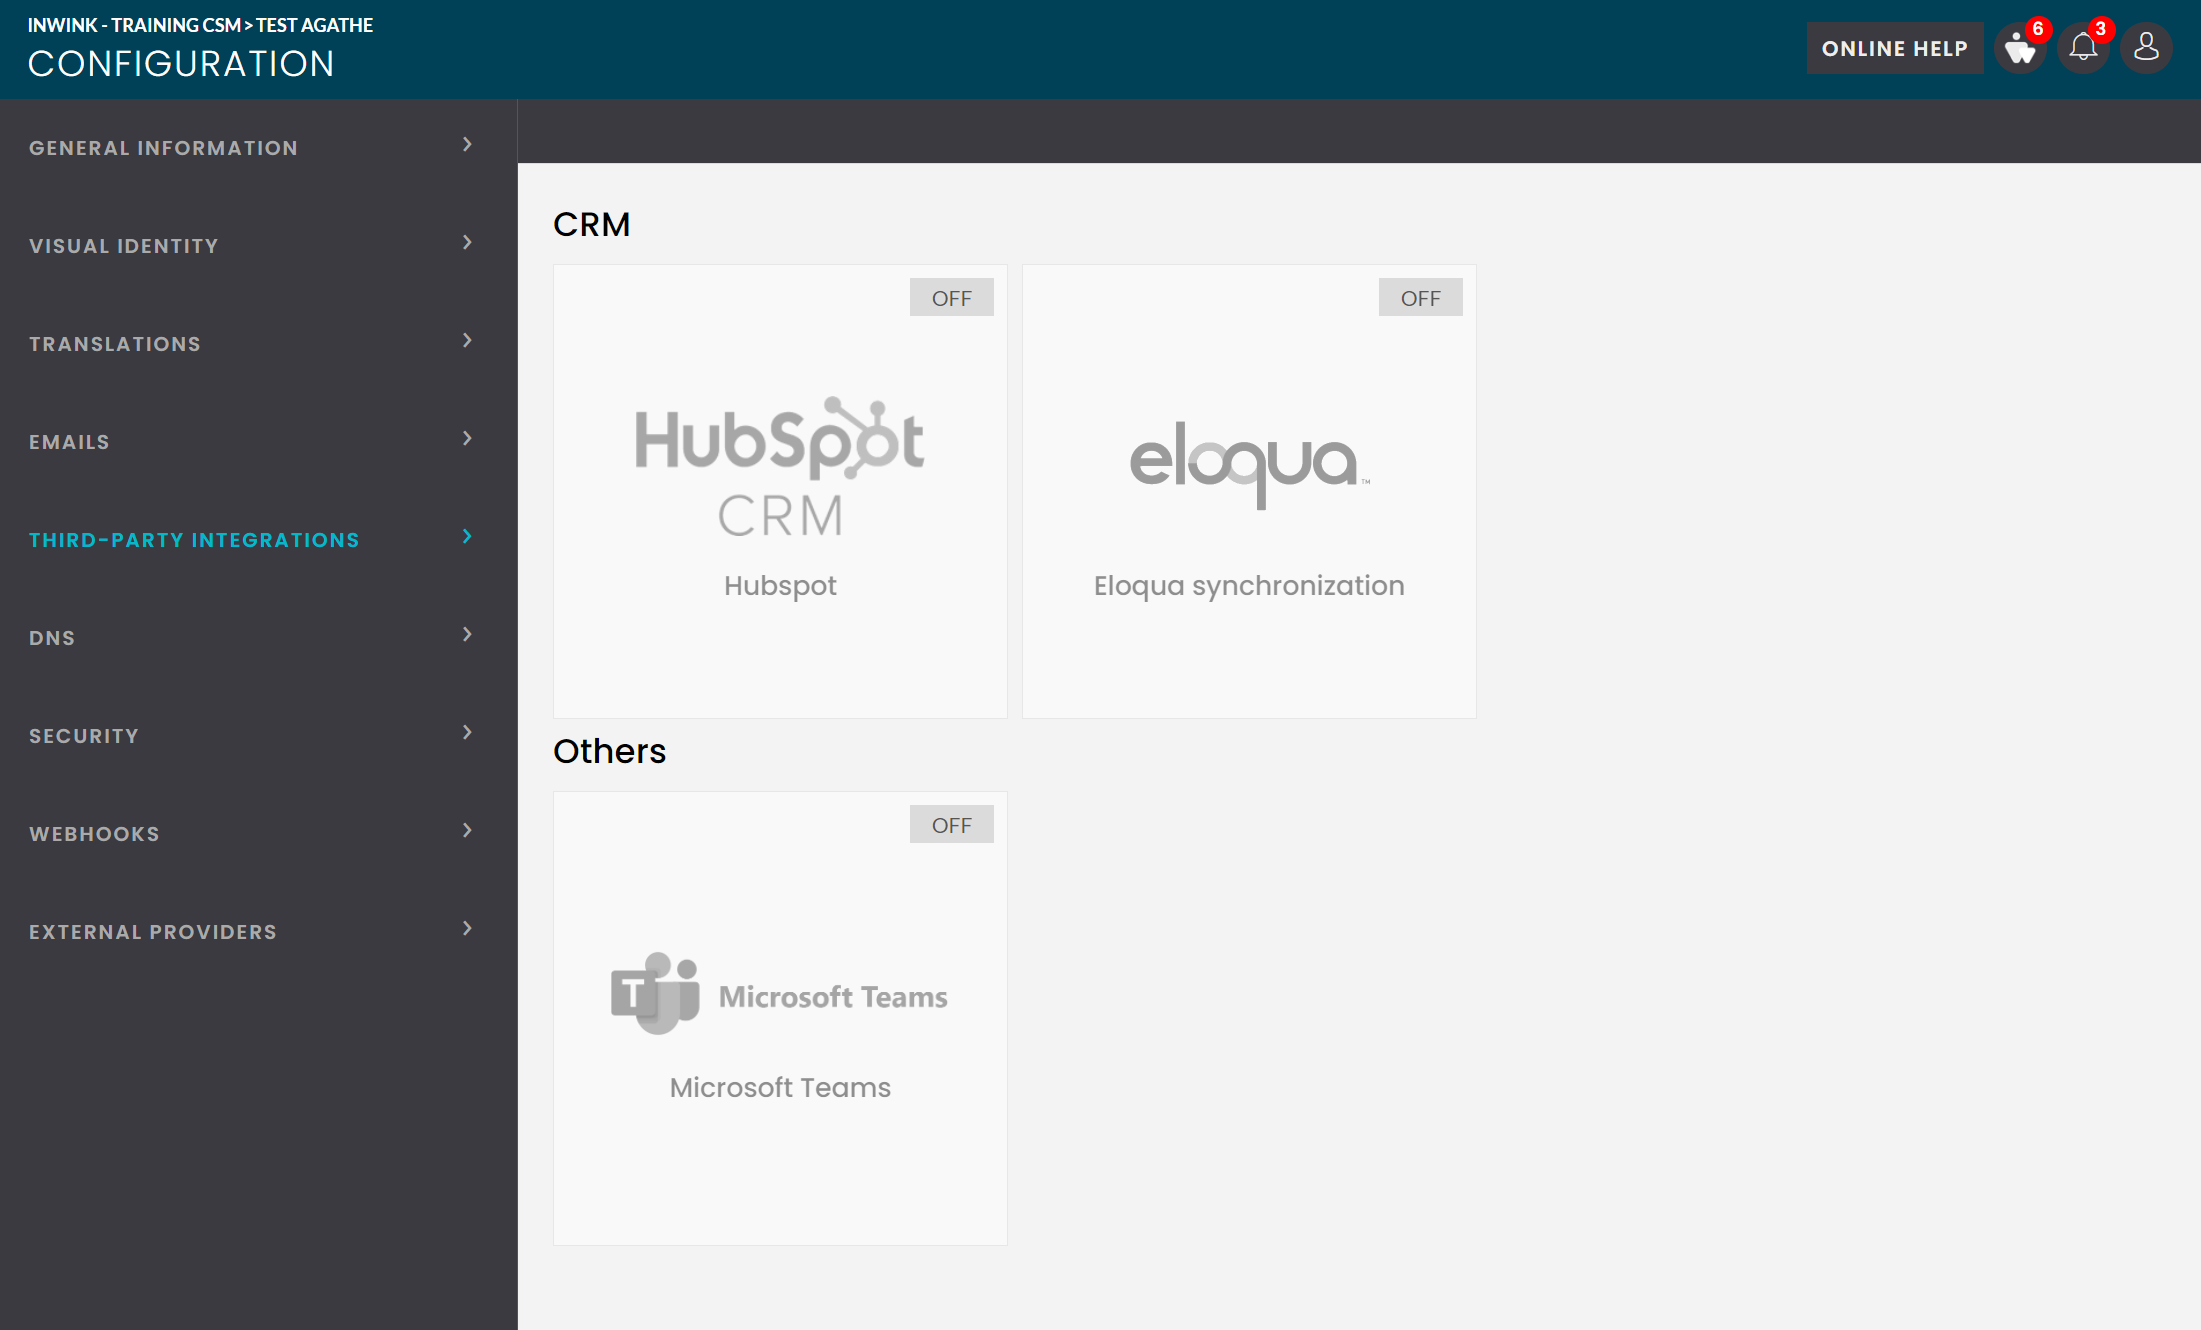
5. Third-party integrations
Here you can activate one of 3 third-party tools:
- HubSpot CRM
- Eloqua
- Microsoft Teams
6. Domain name configuration
Find all the information about the configuration of your domain names on the inwink help online.
7. Security settings
You can further configure the security rules and operation of the login screen associated with a user group by going to the Back-Office Client, Audiences > Name of the audience group you wish to configure > Configuration > SECURITY SETTINGS.
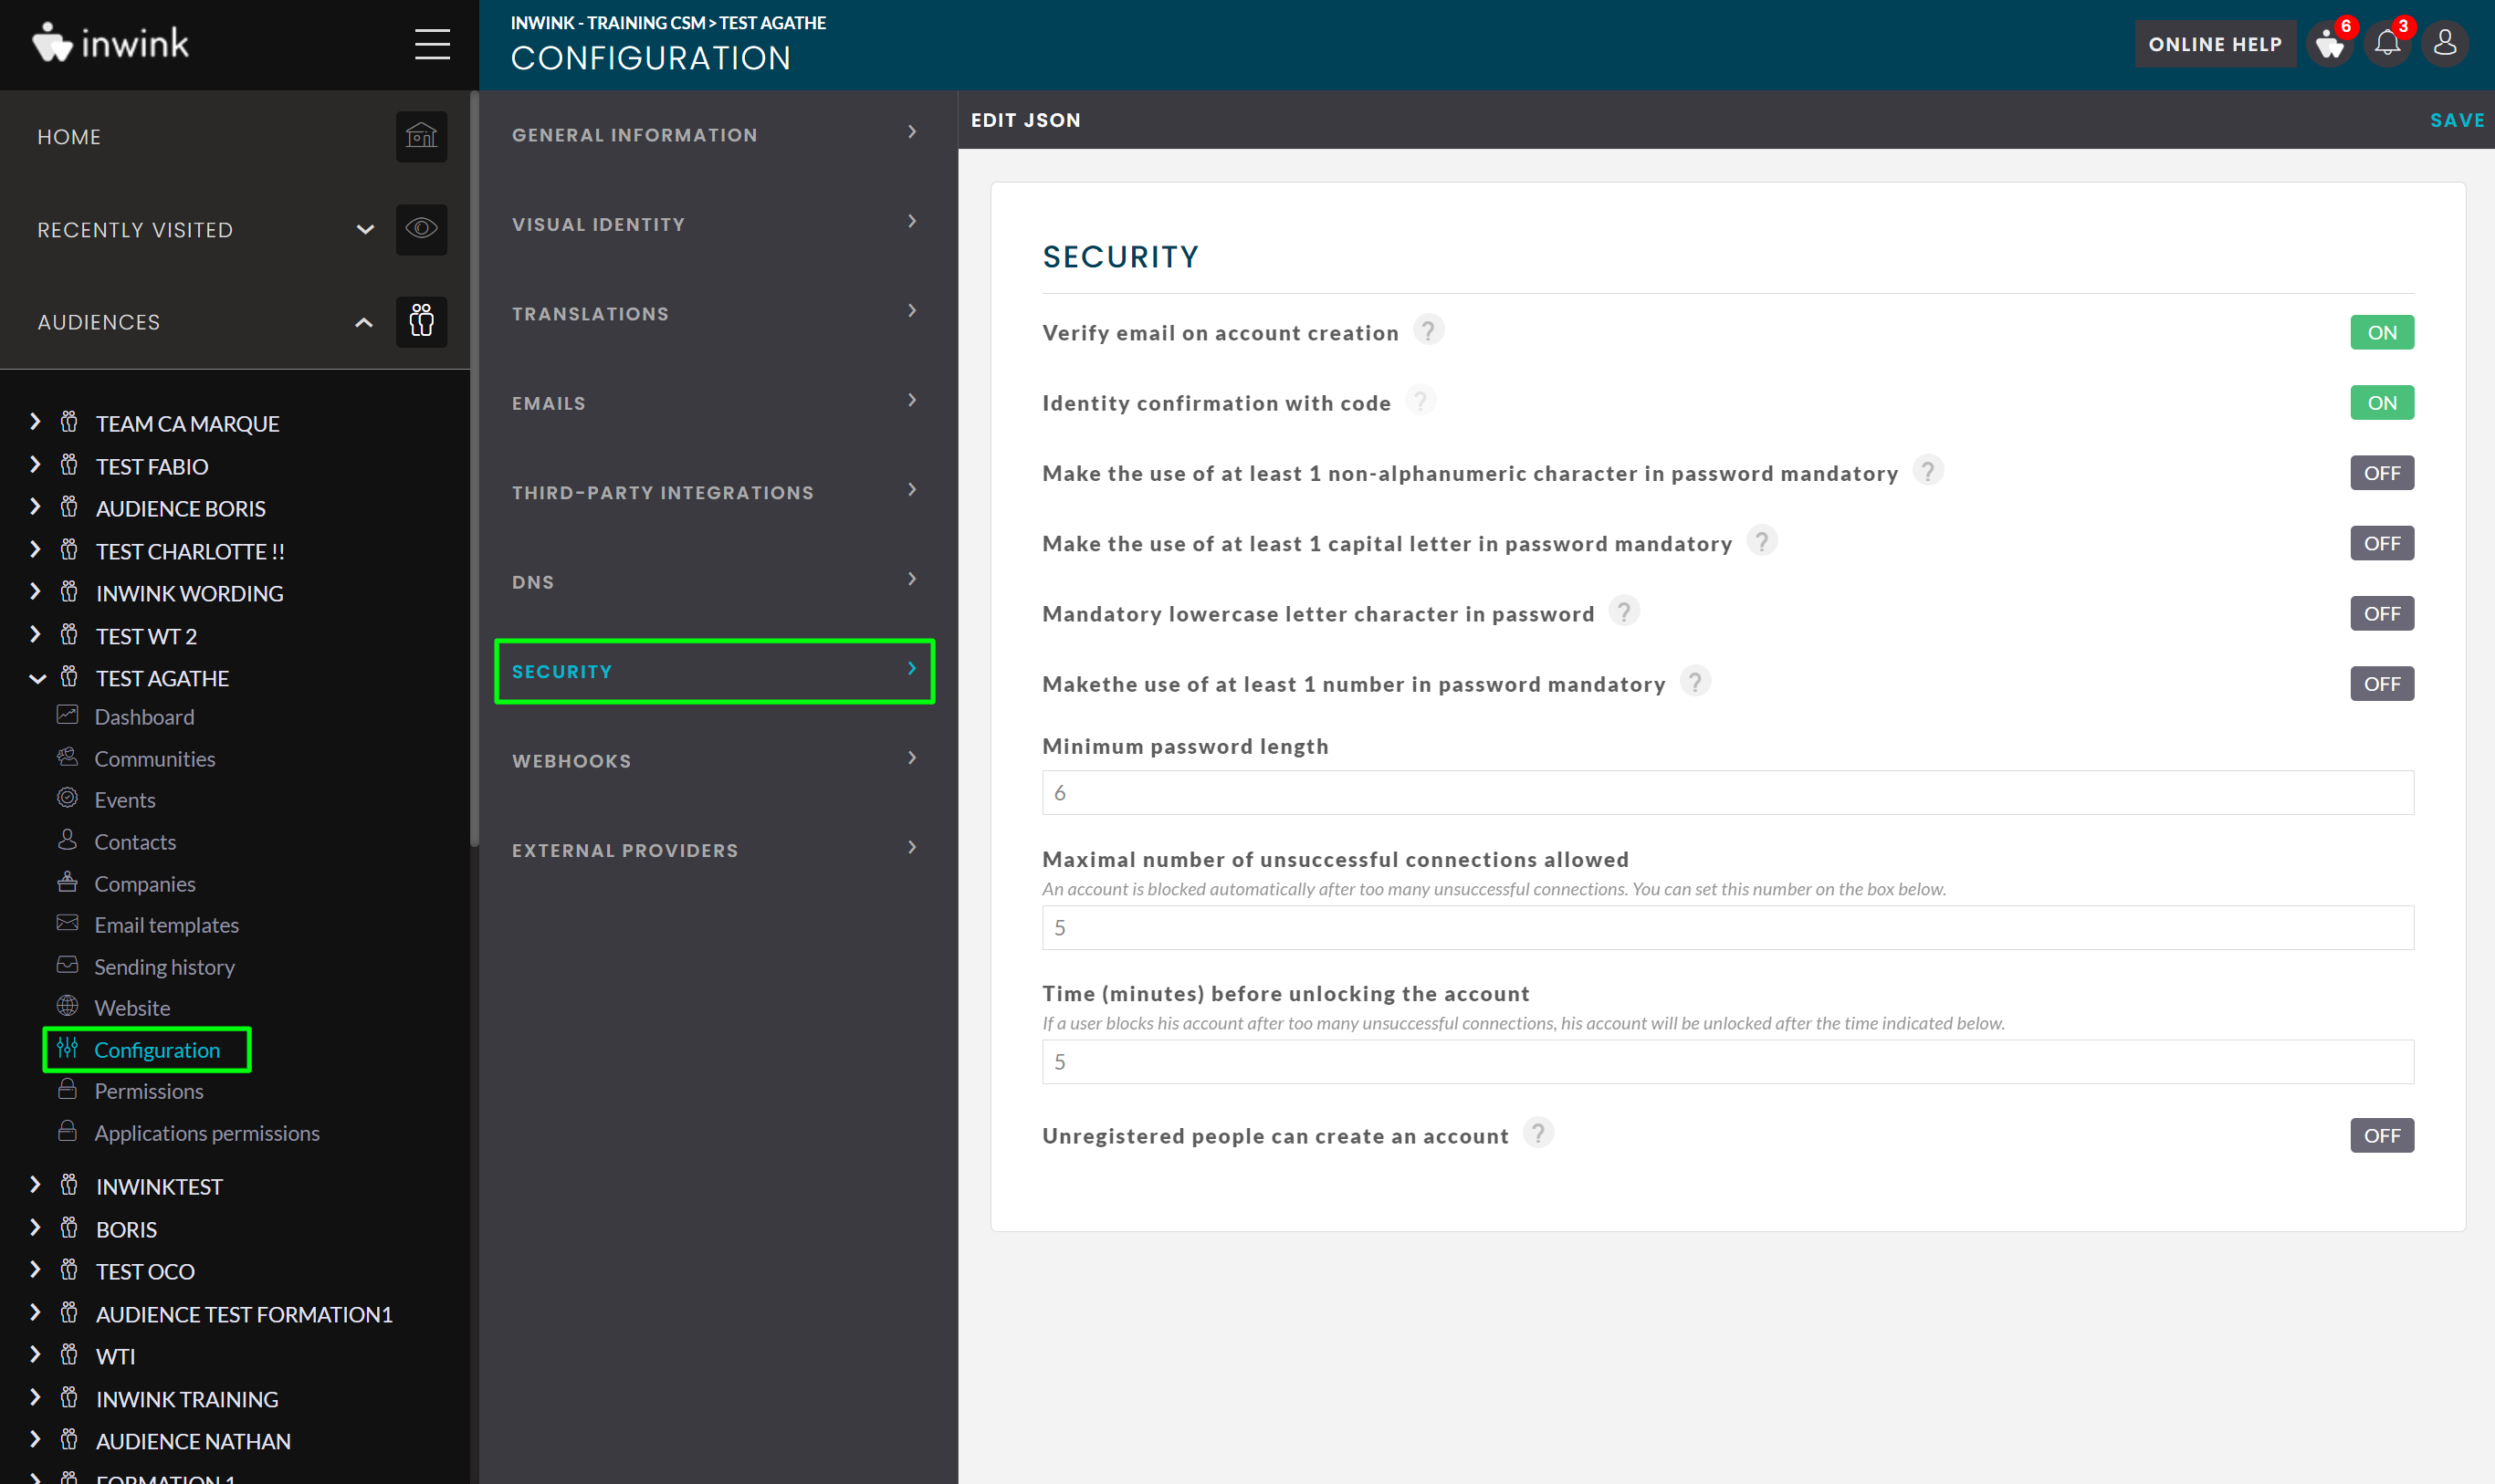
-
Email verification on account creation: If this feature is enabled, participants creating an account will receive an email containing an account creation confirmation link that they will need to click to log in the first time. You can disable this option, but you will have to manually validate user account creations in the user grid.
It is advisable to leave this option on, except in very specific cases where you have a restricted audience / one person to confirm account creations manually on a daily basis.
-
Confirmation of identity with code : If this option is enabled, people creating an account / resetting their password on the login screen associated with user accounts will receive a 6-digit code as a link to confirm their account creation / account password change.
It is advisable to activate this option if you have an app for your event.
-
Non-alphanumeric character required in the password : If this option is enabled, a non-alphanumeric character is required in the password when the account is created. If you enable this option during an event, users who have already created an account will not have to reset their password even if the password does not contain a non-alphanumeric character.
It is recommended that you enable this option.
-
Mandatory number in password : If this option is enabled, a number is required in the password when the account is created. If you enable this option during an event, users who have already created an account will not have to reset their password even if the password does not contain a number.
It is recommended that you enable this option.
-
Minimum password size : Here you can specify the minimum number of characters required in the password when the account is created. If you change this option during an event, users who have already created an account will not have to reset their password even if it contains fewer characters than specified in this setting.
It is advisable to request a password of at least 8 characters.
-
Maximum number of attempts to access the user account : you can set the maximum number of attempts to access the account before blocking the account. This setting allows you to protect your users from account hacking attempts.
It is advisable to block the account after 5 attempts.
-
Time (minutes) to release the account : you can set the maximum time in minutes for blocking a user account.
It is advisable to block the account for 5 minutes to ensure that it is not a hacking attempt.
-
Allow non-registered people to create an account : If this feature is disabled, only people who are registered for one of the events with which the login screen is associated will be able to create an account. Otherwise, anyone will be able to create an account without being registered.
Remember to click on SAVE in the top right-hand corner of the screen once the settings have been made