
Scheduled notifications are managed from your back-office, under Attendees > Interactivity > Scheduled notifications.
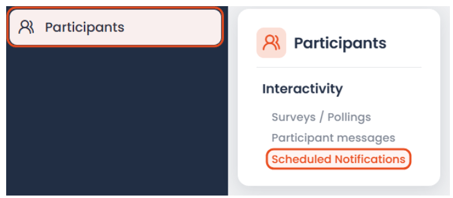
As a reminder, the All, Scheduled and Sent tabs let you track notifications by status over time: the ones still to come and the ones already sent.
⚠️ Good to know before you start:
- Check that Firebase is enabled. Mobile app notifications only work once Firebase is enabled, and so does their configuration.
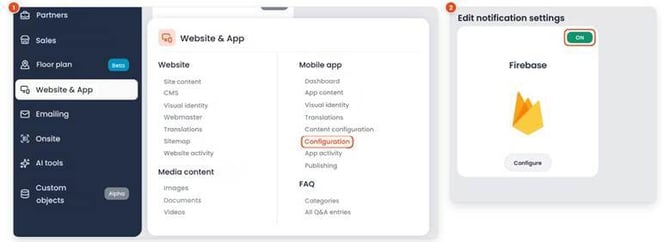
- Only notifications created from this page are tracked here. A notification sent from the Attendees menu does not appear in the scheduled notifications view.
- Check your automated sends. Before scheduling a notification, review the ones already set up in Emailing > Automated sending, so you don't send the same message twice to the same people.
Which type of notification should you choose?
There are 2 types of notifications available for the App.
- Targeted audience for a message reserved for a group, or one that should remain available in the app.
- Mobile push for an announcement to everyone who has installed the app.
|
|
Targeted audience |
Mobile push |
|
Who receives it |
The attendees or members you target with filters, or everyone if no filter is set |
Everyone who has installed the app and allowed notifications, including people without an account |
|
Where it appears |
In the notification feed of the web app and the mobile app, plus a notification on the phone |
On the phone, as a notification |
|
How to target |
With filters on profiles: category, language, networking… |
By app (one or more events from a community), and optionally by language |
|
Where it opens |
In the mobile app or on the web, depending on where the person reads it |
Always in the mobile app |
Create a notification
- Click the Create a notification button. The Notification content window opens.
- Enter the Title (required, 200 characters max).
- Enter the Message (required, 500 characters max).
- Under Link, choose where the notification leads (see "Choose the link" below). Leave No link if the message is self-contained.
- Under Scheduled date, enter the sending day and time, for example "November 24, 11 a.m.".
- Under Notification type, select Targeted audience or Mobile push, then follow the matching section below.
- Click Schedule.

The notification appears in the Scheduled tab until it is sent.
If you chose "Targeted audience"
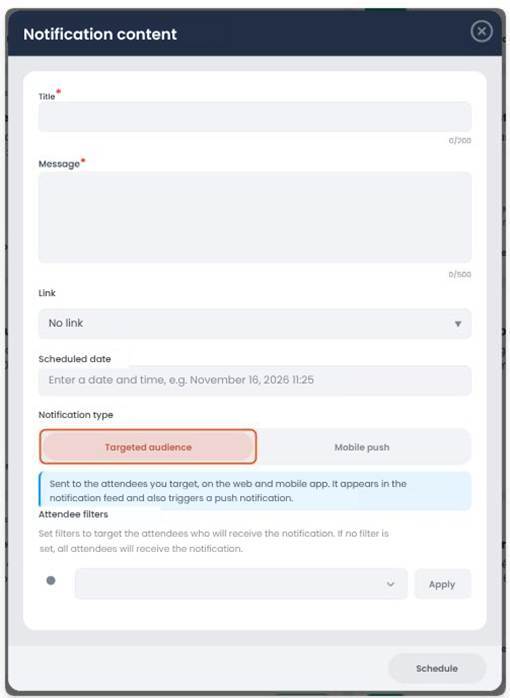
Under Attendee filters (or Member filters from a community), define who will receive the notification. Without a filter, everyone receives it.
- Choose a field from the drop-down list.
- Choose a condition, for example Is equal to.
- Enter the expected value.
- Click Apply. Repeat to add more filters.
The list includes the fields of the attendee profile, including your event's custom fields, so it varies from one event to another.
A few common filters:
- Allows networking: invite the people who accepted networking to book meetings.
- Abstract author: remind authors of a deadline.
- Call for applications author: inform applicants about a selection step.
- Language: target only the people who use a given language. Choose Is equal to and type the language name in full, for example "English".
If you chose "Mobile push"
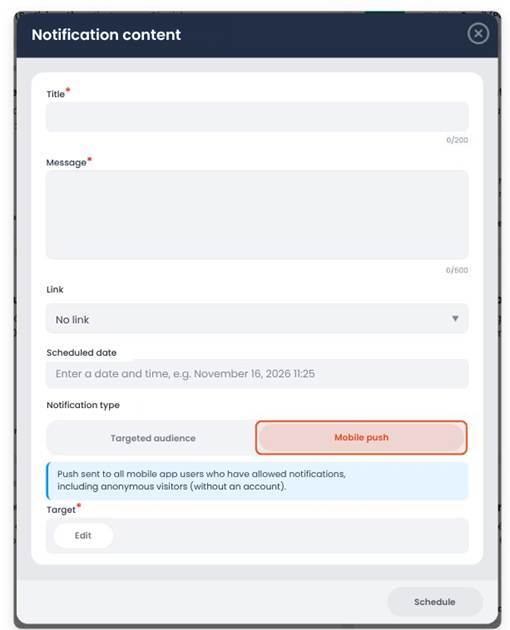
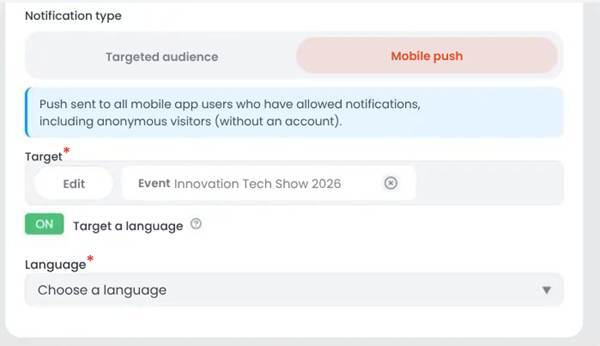
- Under Target (required), click Edit and choose the app to send the notification to. From a community, you can select the community and one or more of its events to reach their users in a single send.
- To target only the people who use the app in a given language, turn on Target a language, then choose the Language.
Choose the link
The link determines what opens when the person taps the notification. A Mobile push notification always opens from the app: only the "Opened from the mobile app" column applies to it.
|
Option |
Opened from the mobile app |
Opened from the web |
|
No link |
Nothing: the person only reads the message. |
Nothing: the person only reads the message. |
|
inwink page |
A page of your inwink site, in the browser: the person leaves the app. |
The page of your inwink site. |
|
page detail |
The detail page of a piece of content, for example an article, in the app. |
The same detail page, on the website. |
|
URL |
The web address entered, for example an external site, a form or a video. |
The web address entered. |
|
Email address |
A new message addressed to the address entered, for example the organizing team's: the person just has to write and send it. |
A new message addressed to the address entered. |
|
File |
The chosen document, for example the floor plan as a PDF. |
The chosen document. |
|
Anchor |
A specific spot on a page, to take the person straight to the right section. |
The same spot on the page. |
Page detail is the safest choice: the content always opens in the right place, and the person stays in the app when they read the notification there.
To link to an app page other than a detail page, for example the agenda page, a specific link can be generated for you. Ask your app CSM.
Import notifications
Import lets you schedule several notifications at once from an Excel file.
- Open the ⋮ menu to the right of Create a notification, then click Import.
- Click Download the Excel template.
- Fill in the template, one row per notification (see the table below).
- Drag the file into the window, or click to select it on your computer (.xlsx or .xls).
- In the Scheduled tab, open each imported notification to add the link and filters if needed: they can't be set in the file.
Fill in the Excel template
Only fill in the columns for the chosen notification type and leave the others empty.
|
Column |
Targeted audience |
Mobile push |
|
Title (200 characters max.) |
Required |
Required |
|
Message (500 characters max.) |
Required |
Required |
|
Sending date |
Required, in DD/MM/YYYY HH:MM format |
Required, in DD/MM/YYYY HH:MM format |
|
Notification type |
BasicNotification |
DirectPush |
|
Membership level or attendee category |
Optional: the level or category to target, for example "Exhibitor" |
Empty |
|
Push target |
Empty |
From a community: the targeted event(s). From an event: empty |
|
Language |
Empty |
Optional: the language code, for example "fr" or "en" |
Warning: the three-dot button (to the right of the "Create a notification" button) also offers Delete all scheduled notifications. This option deletes all notifications not yet sent, including the ones created manually.
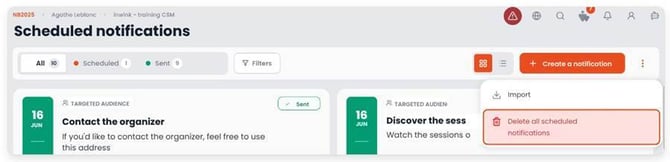
Warning: the three-dot button (to the right of the "Create a notification" button) also offers Delete all scheduled notifications. This option deletes all notifications not yet sent, including the ones created manually.