In this article
What types of events should be created/linked to the community?
Adding an event to the community
Configuring authorised events (back-office)Allowing non-members to register for community events and webinars
Publication status
❗Please note
- Events authorised on the community site must first be configured in the back office by an administrator.
- Moderator rights are required to create an event on the community site
What types of events can I create/bind in the community?
There are four types of event in the community:
- Community event (creation)
- Webinar in the community (create)
- Upcoming inwink event (to be linked to the community)
Event present on the same audience as the community - External event (to be referenced in the community)
Event on an external site, independent of the community
Adding an event to the community
There are two ways of adding an event to the community, from the back office or from the community website.
From the back office:
- Click on the Contents tab > All events, then on the button ➕
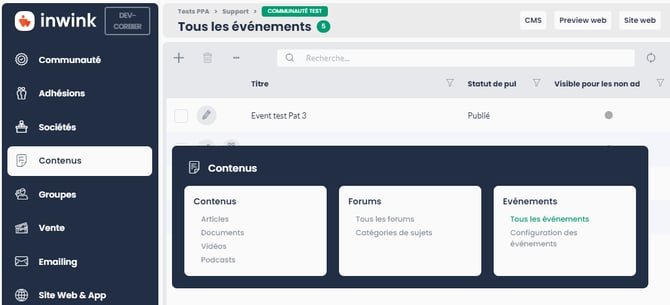
- The add event window opens
 The default event type is Webinar.
- Click on 'Update' to choose the type of event you want to create:
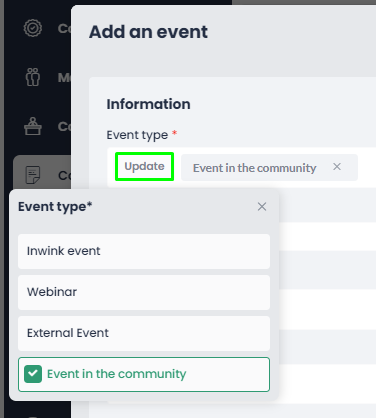
- Once you have chosen the type, you need to fill in the event details and then save the file.
From the community website (if you have moderator rights)
- On the community website, go to the events page > in the black banner, click on ‘Add an event’> then select the type of event you want to create
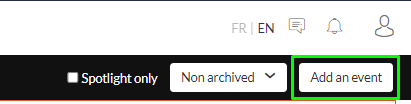
🕵️ The ‘Add an event’ button is missing?
See below: Configuring authorised events (back-office)
- Type of event to create :

- Once you have chosen the type, you need to fill in the event details and then save the file
The information required for creation is :
- Type of event
- The title
- Start and enddates
- If webinar: Speakers and moderators
You can also add a registration quota when creating your event. This field is not mandatory, so you are not required to enter a maximum number of registrants.
Configuring authorised events (back-office)
To allow a moderator member to create events, they must first have been added to the configuration in the back office.
Go to Contents > All events > Authorised events.

Click on ‘Modify’ to choose the event(s) authorised for the community:

The choice of authorised events is very important , as it determines the type of event that the moderator can or cannot create from the community site by clicking on ‘Add an event’(See'From the community site (with moderator rights)'')
If only one event has been set up in the configuration, no proposal will be displayed, and only the type of event provided will be activated when the add button is clicked.
The list of event choices is displayed as soon as two events have been configured.
Allowing non-members to register for community events and webinars
Under the events configuration you will find the ON/OFF activation button to choose whether to allow non-members to register for community events and webinars.(registration for inwink events and external events does not depend on this choice)

L'activation de cette option fait apparaitre la possibilité de relier une page d'inscription.

This page may be different from the one for joining the community.
Depending on your needs, you can create a specific registration page for non-members to give them a different membership level to that of members (for example, a membership level for just one month), or not set a membership level at all.
Adding a registration page
To add this form, start from a blank page, then add a ‘ Membership form’ block.

Please note:
If the registration form used for non-members contains default values for the membership level, then the person registering for the event will automatically become a member of the community with the membership level entered.
If the registration form used for non-members does not contain a default value for the membership level, then the person registering for the event will appear in the back office in the list of members but will not have a membership level and therefore will not have access to all of the community's functions (depending on how the community is configured).
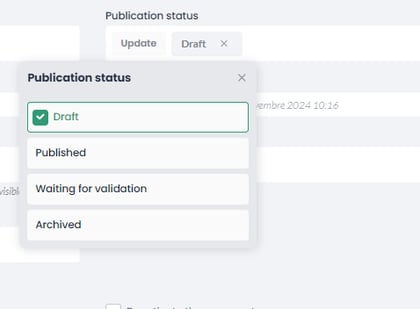
Publication status
By default, when configured, the publication is set to ‘Draft’ status:

Once the event has been configured, you can make it visible on the site by ‘publishing’ it.
Other options are also available:
- Archived: the event will no longer be visible in the community, but can be restored at any time.
- Draft: Your event is being drafted and will only be visible as a preview.
- Pending validation: Your event will have to be validated by a member who has the appropriate membership level to do so
- Published: Your event will be visible to the members concerned
Publication status can be changed at any time if necessary
- From the back office: click on the Contents tab > Events, then edit the event :
- From the community website (with moderator rights): go to the events page > in the moderation bar (black banner), click on the current status to modify it and then save it.

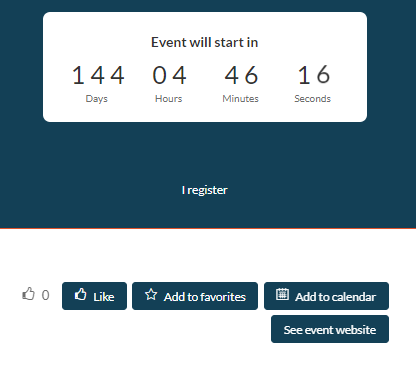
Visibility for users (on the community)
For users on the site, various buttons may be displayed depending on the specific conditions set for each event.
On the event page, the following buttons are available:
- Register/Unregister (not applicable for community-only events)
- Like
- Add to Favorites
- Add to Calendar (creates an .ics file)
- Sign up for the event (if one of the two options was selected during the event creation)
- View Event Site: this button redirects users directly to the registration page of the external event (for upcoming inwink events)